Fansubbing Guide
This project aims to become a public guide for aspiring as well as veteran fansubbers that everyone can contribute to. It is currently under construction as many topics are still missing, but will hopefully cover all important areas and roles that go into the fansubbing process. (Please help by improving the pages and filling in TODO entries. More details are provided on the next page.)
To start reading, you can click on the arrow on the right or press your → key to go to the next page, or you can browse the page index on the left.
The project is hosted on Github and available to read online at https://guide.encode.moe/.
Contribution Guidelines
If you are interested in supporting or contributing to this guide, please keep on reading.
If you are not, feel free to skip to the next page.
We are currently still in the early phases of this guide, so any form of contribution, including just giving feedback, is greatly appreciated. Please open an issue on our Github repository with your feedback, or begin working on a Pull Request.
If you are mainly looking for things to work on, refer to the TODO section.
General
Language
The language of this guide is English. American or British English are both acceptable and there is no preference for either.
The only exceptions are pages specific to a particular language, for example with references to online dictionaries or official grammar rule books, or other typographic advices, for example concerning the usage of quotation marks.
When adding such a page, please briefly describe in your Pull Request what the text is about, what topics it covers, and, if necessary, why it only applies to a specific language.
Technology
This guide is written in Markdown and uses Rust’s mdBook to compile the static HTML pages.
In order to build and preview the guide locally, you only need to install mdBook, which can be done via the provided binaries or directly installing via Crates.io, Rust’s package registry:
$ cargo install mdbook
Updating crates.io index
Installing mdbook v0.4.1
Downloaded syn v1.0.38
...
Downloaded 4 crates (501.9 KB) in 0.42s
Compiling libc v0.2.74
...
Compiling mdbook v0.4.1
Finished release [optimized] target(s) in 2m 56s
Once an mdbook executable is installed,
running mdbook serve in the root directory of the guide’s repository
and opening http://localhost:3000 with your browser
will show a preview of the book.
Any changes you make to the source .md files
will cause your browser to be refreshed and automatically reloaded.
$ mdbook serve
[INFO] (mdbook::book): Book building has started
[INFO] (mdbook::book): Running the html backend
[INFO] (mdbook::cmd::serve): Serving on: http://localhost:3000
[INFO] (warp::server): Server::run; addr=V6([::1]:3000)
[INFO] (warp::server): listening on http://[::1]:3000
[INFO] (mdbook::cmd::watch): Listening for changes...
Changes to the theme can be done by editing the .css files in /theme/css/.
For information on adding plug-ins or changing the way the book is built,
see the mdBook User Guide.
Adding a New Page
In order for your page to be accessible,
you need to add it to the SUMMARY.md file.
The title used there will be used in the navigation bar,
so keep it short.
TODO
Various sections are still under construction.
You will occasionally find TODO as verbatim text
or within comments.
Our goal is to have a section with one or more pages for each of the roles specified in the roles page.
Feel free to work on any of the TODO marks
or create a new section.
Currently, we aim to add the following topics in no particular priority:
- Workflow
- Translation
- Edit
- Timing
- Basic Procedure
- Snapping
- Joining, Splitting
- Post-processing (TPP & Useful Scripts)
- Shifting & Sushi
- Karaoke
- Typesetting
- …with Aegisub
- Styling (of dialogue)
- Signs
- Positioning, Layers, Rotation, Perspective, …
- Masking
- Automation Scripts
- Movement & Motion Tracking
- …with Adobe Illustrator
- (…with Adobe After Effects)
- …with Aegisub
- Encoding [I’m sure there’s something to be done]
- Quality Check
- Karaoke Effects
There is a collection of links here that can be used as reference when working on any future section.
Style Guidelines
The following are the style guidelines for various aspects of this guide. The most important aspect is having Semantic Linefeeds. The other points may serve as guidelines for formatting future pages. Refer to the Markdown Guide for guidelines on visual formatting.
Semantic Linefeeds (!)
Always use Semantic Linefeeds when editing text. They are used to break lines into logical units rather than after a certain line length threshold is reached!
They drastically improve sentence parsing in the human brain and make code diffing much more simple compared to hard-wrapping at 80 columns. You should still aim not to exceed 80 columns in a single line, but unless you are writing code or URLs, you will most likely not have any problems with this. Markdown will collapse adjacent lines into a paragraph, so you don’t have to worry about the rendered result.
As a rule of thumb, always start a new line on a comma, a period, any other sentence terminating punctuation, parenthesized sentences (not words), or new items in a long list (such as the one you are reading right now).
Indentation
The indent size is two spaces.
Lists
Unordered list lines should be indented once,
while ordered lists are indented twice.
The text of an unordered item should have one space after the -,
while the text of an ordered item
should start on the fourth column
(start every line with the number 1).
- This is an unordered list
  - With a sublist
  - And another item in that sublist
1. This is an ordered list
1. Another list item
…
1. Last entry of the list
Blank Lines
All block lists should be separated from text with a blank line on each side. The same applies to code blocks.
Separate headings from text with two blank lines before the heading, and one after. Headings immediately following their parent heading only need one blank line in-between.
Additionally, separate text from end-of-section hyperlink lists with one blank line before the list. For image embeds, there should be a blank line on each side.
Horizontal rules can be useful for splitting subsections or
as a visual guide to where the next explanation begins.
They are created with a sole --- on its own line,
and must have a blank line on each side.
Hyperlinking
There are three types of hyperlinks.
- The text you want highlighted is more than one word,
or different than the shorthand name of the link.
[website's great article][short]- website’s great article
- The text you want highlighted is the same as the shorthand.
[short][]- short
- You want the full address displayed.
<https://guide.encode.moe/>- https://guide.encode.moe/
For the first two hyperlinking styles, you will want to include a line at the end of that header section in the following format.
[short]: https://guide.encode.moe/
If there are multiple links used in the first two styles, you will want multiple lines at the end of the header section.
[short1]: https://guide.encode.moe/
[short2]: https://guide.encode.moe/CONTRIBUTING.HTML
…
For relative links (links to other pages, images, or files within this repository), follow the guidelines for Jekyll Relative Links.
Section Linking
If you are linking to a section on the same page,
[section name](#header) is allowed in-line.
An example of this is the hyperlink section you are reading.
In markdown, this is simply [the hyperlink section you are reading](#hyperlinking).
Section names are converted to all lowercase,
replacing spaces with a - dash,
while disregarding all non-alphanumeric characters
with the exception of the literal - dash being kept.
Therefore, a section named $aFoo-Bar b2 ! can be referenced
as foobar.md#afoo-bar-b2-.
Adding Images
When adding images to your paragraphs, use the following syntax1:

*Visible caption text*
Make sure your image is separated from other images or text with a blank line above and below, as this will align them correctly and allow for the caption to be displayed.
Try to avoid adding lossy images to the guide
(all screenshots should be lossless from the source).
Also, make sure your image is compressed as much as possible
before committing it.
This can be done with pingo’s
lossless PNG compression: pingo -sa file.png.
When extracting frames directly from a VapourSynth pipline
where the format might be vs.YUV420P16 (YUV 4:2:0, 16-bit),
convert your image to vs.RGB24 (RGB 8-bit) before saving as a PNG.
This is because many, if not all, browsers don’t support
images with bit-depths higher than 8 bpp,
and the dithering behavior of some browsers may be different from others
or poorly executed.
You can change the format and bit-depth while saving to a PNG file with the following lines:
# replace `{frame}` with the frame number of the clip you are extracting
out = core.imwri.Write(clip[{frame}].resize.Bicubic(format=vs.RGB24, matrix_in_s='709', dither_type='error_diffusion', filter_param_a_uv=0.33, filter_param_b_uv=0.33), 'PNG', '%06d.png', firstnum={frame})
out.get_frame(0)
Citations
If you are archiving another website’s text or copying their images into this repository, make sure to cite your sources using APA formatting. To generate APA citations, use PapersOwl. Only use this if you fear the website is not a permanent source.
For mid-document citations, use “in-text citations” with footnotes for the full citations. For a full document citation, simply place the full citation at the bottom of the document, under a horizontal rule.
Footnotes
Footnotes can be used for information that would interrupt
the flow or purpose of a paragraph,
but may still be of interest.
They are created with [^#] in-text,
and an additional [^#]: Text here... at the bottom of the page,
separated by a horizontal rule ---,
where # is to be replaced with an increasing
and per-page unique number.
Info/Warning boxes
Info boxes can be used similarly to footnotes, but for information that the reader might want to know before continuing to read the rest of the page.
Warning boxes are similar but are for information that is necessary for the reader to know before continuing to read the rest of the page.
The current syntax uses in-line HTML to render these paragraphs with a different CSS style. These paragraphs must be separated with a blank line above and below similar to images or code blocks.
<div class="info box"><div>

Text here as usual, using semantic linefeed rules.
The blank lines around HTML text are needed
to enable inline Markdown parsing,
for example for text formatting.

</div></div>
<div class="warning box"><div>

This class should be used for important information.

</div></div>
Punctuation
Use the ASCII symbols " and '
for quotation and apostrophe respectively
over the Unicode versions “, “, and ’.
They will be converted during the build process
and in most situations,
text editing tools will work better
with the generic ASCII symbols.
Mathematics with MathJax
This guide has MathJax support,
so in-line or block mathematics can be rendered with TeX.
This obviously requires knowledge of TeX syntax and the supported functions
listed in the MathJax documentation.
To start in-line formulas, the syntax is \\( ... \\).
On the other hand, the block formulas’ syntax is:
$$
...
$$
Similar to ``` fenced code blocks, separate these blocks with one blank line on either side.
This differs from normal Markdown image syntax,
by abusing CSS tags to render the Visual caption text
centered and under the image.
This may be changed in the future with a plug-in.
Preface
What does it take to be a fansubber?
While I’d like to say that the most and only important thing is a healthy (or unhealthy) love of anime, that would be a lie. Being a fansubber takes a lot of work—it can be like having a second job, depending on how many projects you pick up. Even though fansubbers provide a free product as volunteers, there are still expectations that you will put in the time and effort to complete your part in a timely manner.
Now, I don’t want to scare you away, but I do want you to be aware of what you’re getting into.
The most successful fansubbers are often those with lots of spare time such as students, physically disabled persons, and single adults without many commitments outside of work. While an unrestricted schedule isn’t a hard requirement, it is something to keep in mind as you start this process.
That said, some roles can be a means of keeping up or honing a skill. The translator, editor, and quality checker roles are particularly suited to this situation as they require skills that are easily applicable to careers outside of fansubbing. However, these roles are also incredibly difficult to teach, especially with the resources available to fansubbers, so if they are addressed in this guide, it will not be in as much depth as other roles.
If you don’t even know what roles there are to choose from, don’t worry—we’ll get there. For now, let’s move on to some practical requirements.
Roles
There are 8 (sometimes 9) major roles in every fansub group. They are:
- Encoder
- Timer
- Typesetter
- Editor
- Quality Checker
- Optional: Translator
- Optional: Translation Checker
- Optional: Karaoke Effects Creator
- Optional: Project Leader
In this guide, we will only be providing in-depth guides for the Encoder, Timer, and Typesetter roles. However, Quality Checkers are often expected to be familiar with most or all of the roles in order to recognize errors.
This page serves as just an overview of the work various roles will be expected to complete.
Encoder
Time commitment per episode: 20 minutes - 2 hours active (4-12 hours inactive)
Encoders (sometimes abbreviated as ENC) are responsible for the audio and video. They will generally be provided with one or more video sources and are expected to produce the best video possible within reason.
This is done with a frame-by-frame video processor such as AviSynth and VapourSynth1, a video encoder such as x264 or x2652, and audio tools such as eac3to, qaac, and FLAC3. This is not a comprehensive list, but it does represent the broad categories of tools required.
Encoders are expected to have a high level of skill and understanding of video concepts and tools. It is perhaps the most technically challenging role in fansubbing. However, much of the work is repeatable, as each episode in a show will usually be very similar to every other one. It will also get easier over time as they become more familiar with the concepts and tools.
One last note about encoding: there are as many opinions about how to fix video problems as there are encoders. Encoders can and often do become contentious about their work, theories, and scripts. It’s important to keep in mind that a disagreement is not always an insult, and more experienced encoders often just want to help and provide feedback. The important part is the result!
Timer
Time commitment per episode: 20 minutes - 4 hours
The Timer (abbreviated TM) is responsible for when the text representing spoken dialogue shows up on screen.
The timing of subtitles is much more important than one might assume. The entrance and exit times of the subtitles, or a fluid transition from one line to the next, can make a large impact on the “watchability” of the episode as a whole. Take, for example, the following clip from Eromanga-sensei:
On the left are the official subtitles from Amazon’s AnimeStrike, and on the right is a fansub release. There are many problems with Amazon’s subtitles: entering and exiting the screen up to two seconds late, presenting 4-5 lines on screen at once, and not separating dialogue based on speaking character. These problems detract from the viewing experience, drawing attention to the appearance of the subtitles and distracting from the story and video.
Typesetter
Time commitment per episode: 20 minutes - 8+ hours (dependent on number and difficulty of signs)
Typesetters (abbreviated TS) are responsible for the visual presentation of translated text on-screen. These are generally called signs.
For example, given this scene and a translation of “Adachi Fourth Public High School”…
 [DameDesuYo] Eromanga-sensei - 01 (1920x1080 10bit AAC) [05CB518E].mkv_snapshot_03.11_[2017.08.18_21.14.55].jpg
the Typesetter would be expected to produce something like this:
 [DameDesuYo] Eromanga-sensei - 01 (1920x1080 10bit AAC) [05CB518E].mkv_snapshot_03.11_[2017.08.18_21.14.43].jpg
Almost every sign the Typesetter works on will be unique, requiring ingenuity, a wild imagination, a sense of style, and a high degree of attention to detail. The Typesetter’s goal is to produce something that integrates so well into the video that the viewer does not realize that it is actually part of the subtitles.
The sign above is actually one of the more simple kinds that the Typesetter might have to deal with. It is static, meaning it does not move, and has plenty of room around it to place the translation. Other signs will be much more difficult. Take for example this scene from Kobayashi-san Chi no Maid Dragon:
Though it may be hard to believe, the typesetting on the right side of the screen was done entirely with softsubs (using Aegisub), subtitles that can be turned on and off in the video player as compared to hardsubs (using Adobe After Effects) which are burned in. Each group and language “scene” will have different standards in regards to soft and hardsubs. For example, in the English scene, hardsubs are considered highly distasteful, whereas in the German scene they are readily accepted.
Something to remember about typesetting is that there is no one way to typeset a sign. There are, however, incorrect ways that are not visually pleasing, do not match the original well, are difficult to read, or are too heavy (meaning computer resource intensive).
Editor
Time commitment per episode: 2-4+ hours
The Editor (sometimes abbreviated ED) is responsible for making sure that the script reads well. Depending on the source of the script, this may mean grammatical corrections and some rewording to address recommendations from the Translation Checker. However, more often than not, the job will entail rewriting, rewording, and characterizing large portions of the script. Each group will have different expectations of an Editor in terms of the type, style, and number of changes made. The Editor may also be responsible for making corrections recommended by the Quality Checkers.
Quality Checker
Time commitment per episode: 30 minutes to 4 hours (depending on your own standards)
Quality Checkers (abbreviated QC) are often the last eyes on an episode before it is released. They are responsible for ensuring that the overall quality of the release is up to par with the group’s standards. They are also expected to be familiar with the workflow and many intricacies of every other role. Each group has a different approach to how the Quality Checker completes their work. For example, one group might require an organized “QC report” with recommended changes and required fixes, while other groups may prefer the Quality Checker to make changes directly to the script whenever possible.
Translator & Translation Checker
Time commitment per episode: 1-3 hours for translation check, 4+ hours for an original translation (dependent on the skill of the TL/TLC and the difficulty of the show’s original script)
The job of the Translator (abbreviated TL) and the Translation Checker (abbreviated TLC) is to translate and ensure the translational quality of the script and signs respectively. This is perhaps an obvious statement, but it bears explaining just in case. Today, many shows are simulcast by one or more companies, meaning scripts will be available either immediately or soon after airing in Japan. In these cases, some fansub groups may choose to edit and check the simulcast script rather than translate it from scratch. This depends almost entirely on the quality of the simulcast. Fixing a bad simulcast script may be harder than doing an original translation (abbreviated OTL). Finally, translators are responsible for transcribing and translating opening, ending, and insert songs as well.
Karaoke Effect Creator
Time commitment: several hours, once or twice per season
The Karaoke Effect Creator (abbreviated KFX) styles and adds effects to the lyrics and sometimes romaji and/or kanji for opening, ending, and insert songs. This can be very similar to typesetting but utilizes a different set of tools and can be highly programming-oriented.
TODO - sources for AviSynth and VapourSynth builds relevant to fansubbing.
Further reading on the x264 and x265 libraries can be found here.
Comparisons of various audio codecs can be found here.
Requirements
Language
There are fansub groups for almost every language in the world. So, while anyone is welcome to read and use this textbook, I recommend applying your skills in a fansub group centered on your native language. Of course, there are some roles that don’t require any language skills to complete them. But you will still need to communicate with the other members of your chosen fansub group, and a language barrier can make that difficult.
Hardware
Every fansubber will need a computer. Some roles will have higher requirements. Below are some minimum recommended computer specifications based on the role. Can you do the job with less than what’s below? Probably, but it could make your job much harder than it needs to be.
- Timer, Editor, Translator, Translation Checker
- Some of the most forgiving roles in fansubbing for computer hardware.
- OS: Windows 7, Mac OS X 10.7, Linux
- Screen: 720p
- CPU: dual-core >2Ghz
- Computer should be able to playback HD anime with subtitles.
- Memory: 4GB
- Aegisub loads the entire video into memory. With larger HD videos being standard today, this could be up to several GB.
- Storage: 50GB available
- Mouse: recommended
- Internet: 25 Mbps download
- Typesetter, Quality Checker
- The middle of the road in terms of required computer hardware.
- OS: Windows 7, Mac OS X 10.7, Linux
- 64-bit recommended
- Screen: 1080p
- CPU: dual-core >2.5GHz (quad-core >3GHz recommended)
- Computer should be able to playback modern fansubbed anime releases with high settings.
- Memory: 8GB
- Aegisub loads the entire video into memory. With larger HD videos being standard today, this could be up to several GB.
- Windows loads installed fonts into memory on boot. For typesetters, the font library could grow to be several GB.
- Storage: 100GB available
- Mouse: required
- Internet: 25 Mbps download, 5 Mbps upload
- Encoder
- The most demanding role in terms of computer hardware.
- The speed and capabilities of the computer directly correlate to encode times and the stability of encoding tools.
- OS: Windows 7, Mac OS X 10.7, Linux
- 64-bit required
- Screen: 1080p
- IPS panels highly recommended for color correctness.
- VA panels highly discouraged.
- CPU: quad-core >4GHz
- More cores and/or higher speed are better (e.g. AMD Ryzen, Threadripper or Intel Core i7+).
- CPU Requirements:
- Hyperthreading
- AVX2
- SSE4
- Memory: 8GB
- Memory can be a bottleneck when encoding. More, faster memory is always better for encoding rigs.
- Storage: 500GB available
- Encoders sometimes deal with files up to 40GB each and regularly with ones between 1GB and 8GB and may be required to retain these files for a long time.
- Internet: 25 Mbps download, 25 Mbps upload
Software
Every role will have different required software, but it is recommended for every role to have installed Aegisub. It is highly recommended to use CoffeeFlux’s builds. They come pre-equipped with Dependency Control and several critical fixes to Aegisub that have not been merged into the official application.
More specifics will be presented in the chapters devoted to each role.
TODO - pages for each role
Programming
Prior knowledge of some programming languages can be extremely useful for fansubbing, though it is not required. Specifically, Lua and Moonscript are useful for Typesetters. Encoders will find that Python is used to interact with VapourSynth, so learning it ahead of time will be to their advantage.
Collaboration with FTP
In a fansub group, multiple users will need to be able to access and modify a myriad of files. An easy and straightforward way to do this would be by setting up an FTP server. This makes it easy for users to share their files privately, as well as make bigger files easy to find and download by the right people.
FTP setups are very common in fansubbing for this exact reason. An FTP servers offers an easy place for translators and typesetters to upload their subtitle files, as well as for encoders to upload their premuxes or grab source files from.
Setting Up an FTP
TODO: Describe how to set up a basic FTP server, make it connectable, etc.
Folder Structure
TODO: Describe reasonable
Avoiding Filename Conflicts
TODO
Security
TODO: Security measures you can take to prevent someone from wrecking your FTP. Things like user accounts, restricting access per user or group, etc.
Collaboration With git (via GitHub)
When working in a group, you’ll often find multiple people making changes to the same or multiple files. The Translator will need a place to upload their translation to, the typesetter(s) may need a place where they can upload their typesetting to, etc. For this kind of operation, a git environment may be preferable. With git you can very easily do version control, which allows you to see who made changes to what files and when, and also create an easy place to find all the relevant files and their contents without requiring users to blindly download files to edit them the same way they would when working in an FTP setup.
There are many benefits to using GitHub for your project, but it may also require users to be more tech-savvy than with a regular FTP setup, and for there to be someone to the side who can solve any problems that may arise. Additionally, having an FTP available may still be a good idea for your encoders, since they will still need a place to upload bigger files to, which GitHub is not suited for.
Setting Up a GitHub Repository
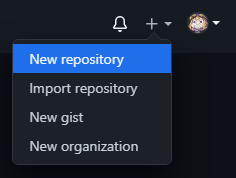
If you are the project leader, you will likely want to be the one to create a repository. For bigger groups, we recommend you start an organization. This will allow you to keep better track of your ongoing projects, as well as assign more administrators who can create and maintain repositories. You can create a repository by pressing the + button on the top-right of the page and clicking “New repository”.
You can then create a new repository under your own username or an organization you have writing access to.
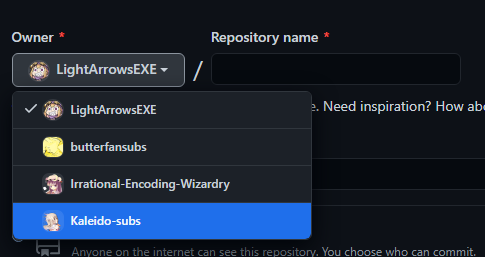
Give your repository a name, and decide to make your repo either public or private. You may also want to add a README if you want to share additional information about the project, like how to build it, or links to your group’s website for example. You can then create the repository by pressing “Create repository”.
If you’re working with multiple users, you’ll want to make sure you to add them to the repository as well. To do this you go to your repository’s settings, and then click on “Manage access”.

Here you can manage what users (and teams in an organization) have access to your repository. When inviting someone, you’ll want to make sure you give them the necessary permissions. If they’re a team member, give them write access.


Basic Actions
If you are new to GitHub, we highly recommend you use the GitHub desktop client (this also works with other, similar platforms). This guide was written under the assumption that most users will be using this client.
Cloning
After installing the desktop client,
open it and log in.
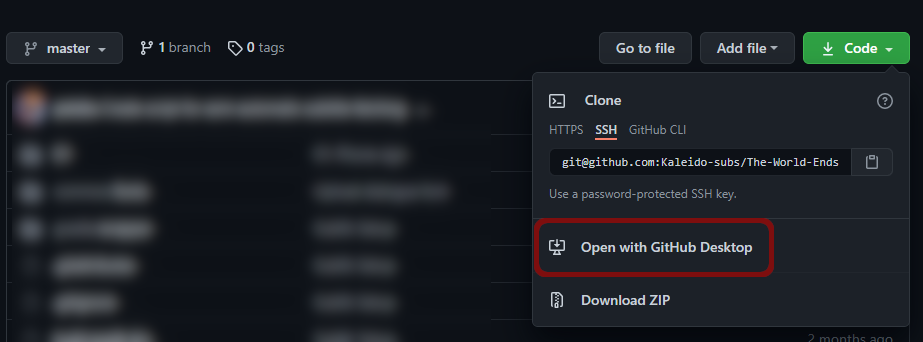
You can then clone the repository to your system by going to File > Clone repository,
or by going to the repository on GitHub and going Code > Open with GitHub Desktop.
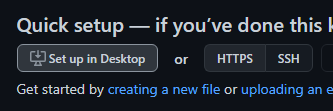
If the repository has not been set up yet, you can set it up in your desktop client through the link on the repository. This will automatically open up the cloning menu in your desktop client.
Syncing File Changes
When editing files from a git repository, git will remember and verify what files have been changed. Before making any commits however, you’ll want to first double-check that you have every file pulled to your local repository. Click “Fetch origin” at the top, and pull in any newly-pushed commits made by other users.
Now you can verify your own changes and commit the files you want to upload/update in the repository. The desktop client will additionally give you a very useful display of what is different between your file and the latest version of the file you pulled in from the repo.
To make things easier for your teammates,
you’ll want to make sure to give your commit a helpful title and description if necessary.
An example of a helpful commit title would be an episode number and what you did in the commit.
For example,
03: Typeset train sign or 08: Edited Part A.
The description can contain more detailed information,
like what exactly was changed (if multiple things were changed),
what problems you ran across along the way,
etc.
 An example of a description that describes what changes were made in greater detail than a title would.
Finally, press “Commit to master”, and once you’ve finished making all your changes and committed them, press “Push origin”.
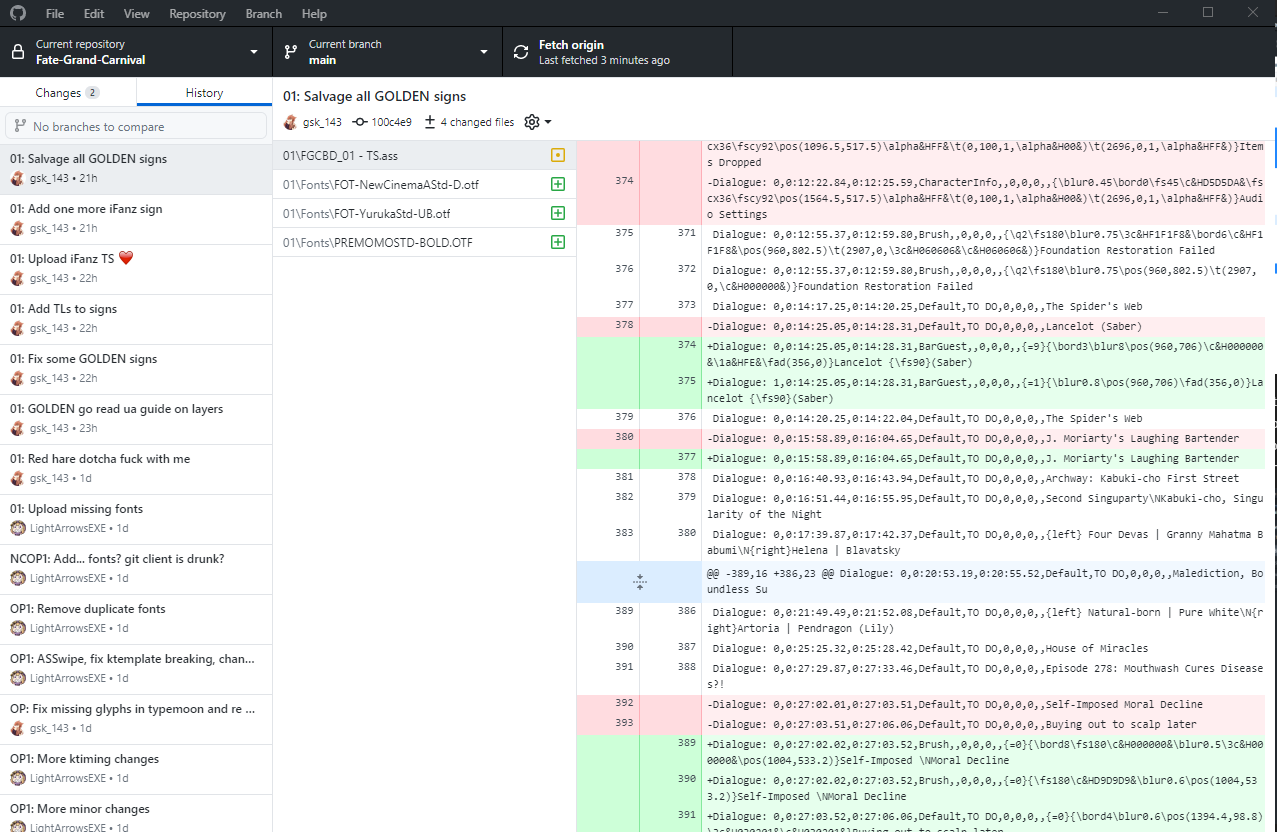
If you want to check the history to see what your teammates have changed, you can view the history by clicking the “History” tab. This will give you a useful oversight of all the commits, as well as their titles/descriptions and what changes have been made to the files.
Resolving Merge Conflicts
There are going to be times when multiple users accidentally write to the same file at the same time. This is usually no issue, but you may from time to time run into a merge conflict. This means that changes made by multiple users are incompatible with one another, and will require manual fixing.
To resolve these,
you’ll want to open up the files with merge conflicts in your text editor
(do not use Aegisub for this).
The parts of the file with conflicts will have a <<<<<<< HEAD before them,
and a >>>>>>> at the end of them.
The differences will be separated by a ========.
You’ll want to look over the differences,
and change them however necessary for your final project.
Finally, you’ll want to remove the conflict marker lines,
so all the <<<<<<< HEAD,
========,
and >>>>>>>’s.
Repeat this until you’ve dealt with every merge conflict,
and then go back to the desktop client and press “Commit merge”.
Make sure you push your changes after!

Setting Up the Files For Your Project
Now that you know how to perform the basic actions, it is important to understand how you can best utilize GitHub. When working in a group, it is important you don’t trip over your teammates. To help with, it is generally recommended you split up the files as necessary to allow people to work in parallel without constantly having to deal with merge conflicts.
The translator, editor, translation checker, and timer will generally require access to a single file, and it’s important they work sequentially; that means they do their job one at a time in an order they agreed on. There are tools available that help separate the timing job from that setup, but that will be covered in a different guide.
The typesetters will also need to have their own files. This separates them from the main subtitle script, which would otherwise get massive signs added while the other members are working, and be harder to work with for them as a result. If there are multiple typesetters, it’s a good idea to split it up further into individual “TS files”. This allows each typesetter to do their part without interfering with the other typesetter’s work.
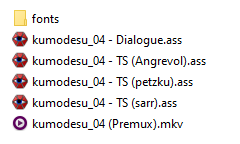 An example of how files are typically split.
You can further split this however you think works best for your project. You could for example add synced Opening/Ending subs to every directory, or an ASS file with an insert song, or an ASS file with all the ktemplates used in that particular episode. Just make sure it all fits well with your group’s workflow.
Using GitHub For Distribution
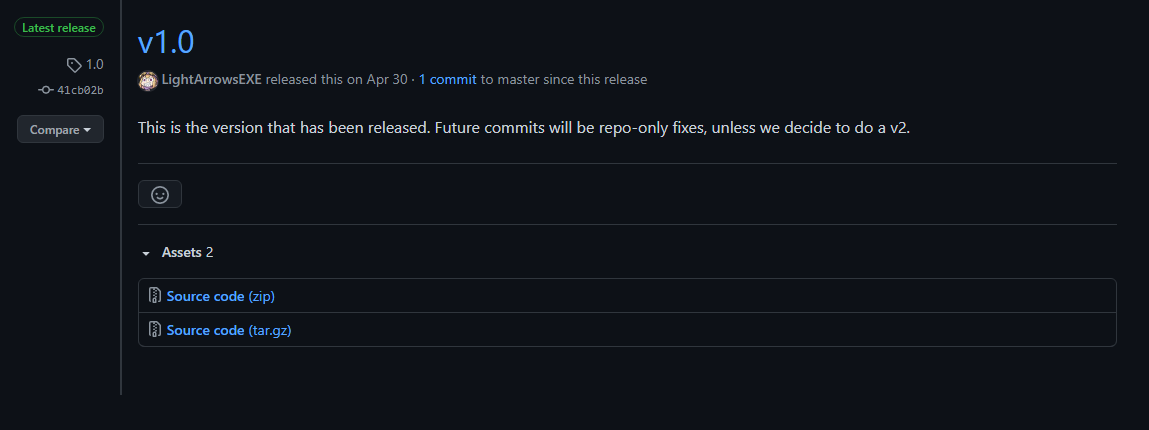
While it may be helpful for members to work on GitHub, sometimes people will simply prefer other setups. Even in those situations, GitHub can prove useful for distribution. It can be the place to look for the most up-to-date scripts after release for instance, with errors that were reported post-release fixed. This way people can always update their scripts if necessary without you needing to release a v2, and they also have a convenient hub to report errors.
If you decide to use a GitHub repository for this, it is recommended you create “Releases”. This way people can easily see when your project was “finalized”, and it gives a convenient way to see what commits were made after finalization.
 v1 release tag
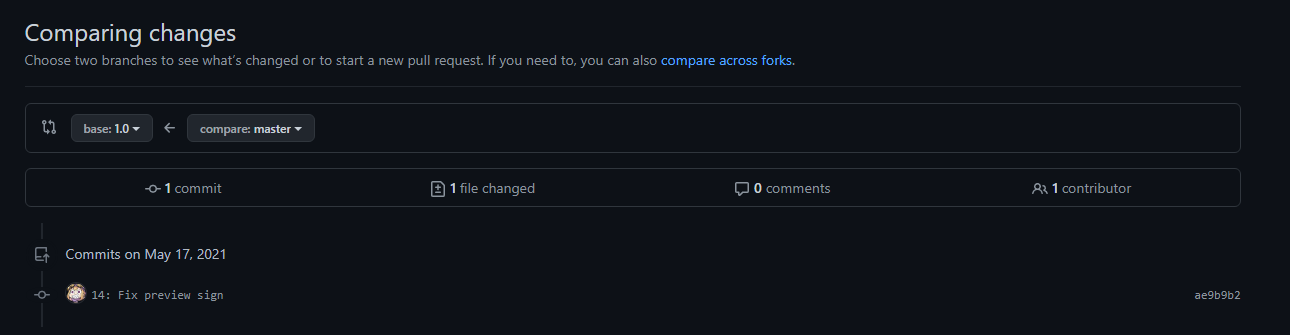 Commits made since v1
Examples
Here are some example fansub repositories:
Preparation and Necessary Software
While the term “encoding” originally just referred to the opposite of decoding—that is, compressing raw video with a video codec—the term has a broader meaning in the context of fansubbing. Here, “encoding” includes the entire process from receiving the source video until the final release. Usual steps are processing or filtering of the original video to remove defects, compressing the video in a way that does not generate new artifacts, transcoding audio to the desired format, and muxing video, audio, subtitles, fonts, and other attachments into a container, such as mkv.
Each of these steps requires different tools which will be listed and explained in the following paragraphs.
It is assumed that you already have a source video at this point, so software like torrent clients, Perfect Dark, Share, or even FileZilla will not be covered. If you don’t have a reliable way to get raws and if your group doesn’t provide them, try finding a source first. Private bittorrent trackers like u2 or SkyeySnow are good starting points.
Processing and Filtering
The Frameserver
In order to process your source video (which will be called “raw” throughout this chapter), you need to import it into a so-called “frameserver”, a software that is designed to process a video frame-by-frame, usually based on a script that defines various filters which will be applied to the video.
Currently, only two widely-known frameservers exist: AviSynth and VapourSynth.
While many (especially older) encoders still use AviSynth, there is no reason to use it if you’re just starting to learn encoding.1 Most AviSynth users only use it because they have years of experience and don’t want to switch.
Since this guide is aimed towards new encoders, and the author has no qualms about imposing his own opinions onto the host of people willing to listen, the guide will focus on VapourSynth. AviSynth equivalents are provided for certain functions where applicable, but the sample code will always be written for VapourSynth.
That being said, the installation of VapourSynth is quite easy. It is strongly recommended to install the 64-bit version of all tools listed here. VapourSynth requires Python 3.8.x or newer. VapourSynth Windows binaries can be found here. Linux users will have to build their own version, but if you’re on Linux, you probably know how to do that. During the installation, you might be prompted to install the Visual C++ Redistributables. Just select “Yes” and the installer will do it for you.
And that’s it. You can test your VapourSynth installation by opening the Python shell and typing:
>>> import vapoursynth
If the installation was not successful, you should receive an error that reads:
Traceback (most recent call last):
  File "", line 1, in <module>
ImportError: No module named 'vapoursynth'
In that case, make sure your current Python shell is the correct version (Python version as well as architecture), try restarting your PC, reinstall VapourSynth, or ask for help.
Plugins
In addition to VapourSynth’s core plugins, community-created scripts and plugins can be installed to extend the functionality of the frameserver. These are usually more specific than the universally usable core plugins or they are collections of wrappers and functions. An extensive database of VapourSynth plugins and scripts is available at VSDB. VSDB also offers a GUI for vsrepo, VapourSynth’s official package manager, and a plugin pack (labeled “Portable FATPACK”) that bundles most popular plugins, scripts, and VS-related applications into one archive for ease of download and installation.
An alternative to the latter is eXmendiC’s encode pack, which contains a lot of encoding-related applications and scripts, on top of a broad collection of VapourSynth plugins and scripts. However, the package is not maintained anymore, and may in part include outdated software.
The Editor
Now that you have installed the frameserver, you can start filtering the video. But without an editor, you have no means of previewing the results other than test encodes or raw output into a file. That’s why editors exist. They provide useful features such as autocompletion, tooltips, preview images, and comparisons.
There are four editors that can be used to preview your VapourSynth-Script.
-
VSEdit. It is a small editor software that can run on your PC. It can be downloaded here. It provides an easy and simple GUI to write your VapourSynth scripts.
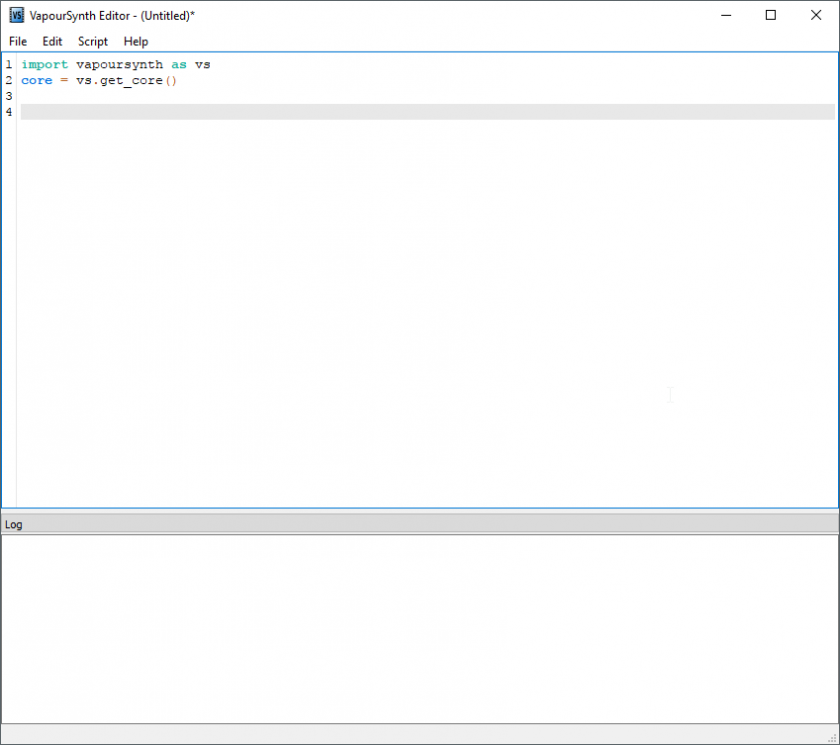 The main window of VSEdit.
While it seems to be unstable on some systems, its high performance preview window offsets its problems.
-
Yuuno. While it is not an editor, Yuuno is an extension to a Python-shell-framework that runs inside your browser. This increases latency, but it gives you a wider range of preview related features while being more stable than VSEdit. It should be noted that Yuuno natively supports remote access, as it is only an extension for Jupyter Notebook.
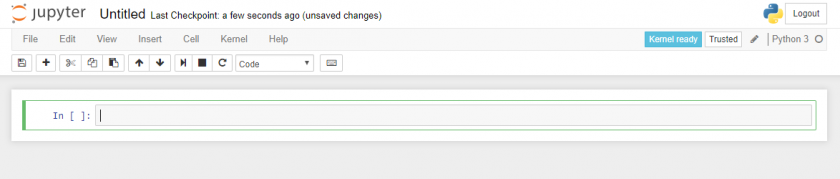 A Jupyter Notebook.
 -
VapourSynth Multi-Viewer. Multi-Viewer is a very simple and elementary previewing tool. While the text editing is vastly inferior to VSEdit’s, and the preview lacks a lot of VSEdit’s advanced features, its tab-based previewing functionality easily outclasses VSEdit’s single preview window, because it makes comparisons between different script versions a lot more convenient and efficient.
In short: very useful for thorough comparisons and filter fine-tuning, not so much for everything else.
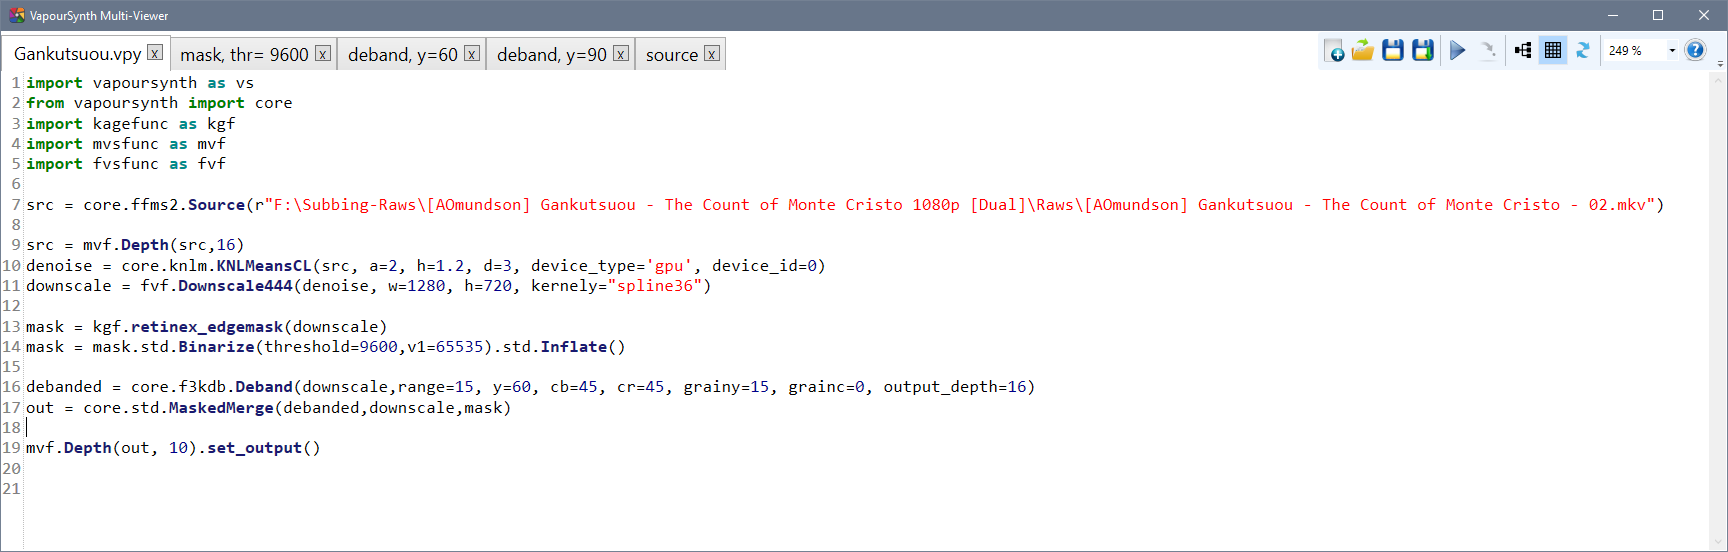 VS Multi-Viewer’s editing window.
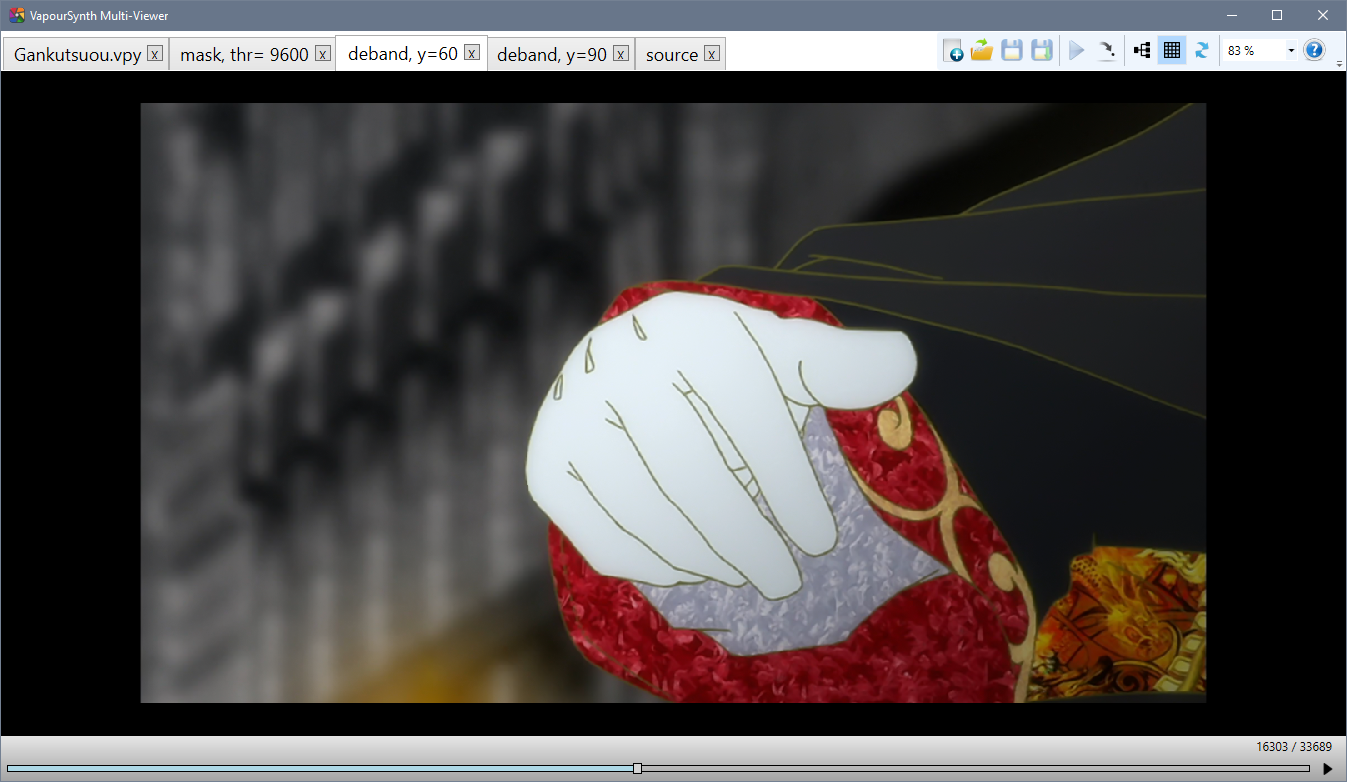 VS Multi-Viewer’s preview window.
 -
AvsPmod. This is the editor for AviSynth. It is old and slow but stable. When you are using AviSynth, you are limited to this editor. AvsPmod can handle AviSynth and VapourSynth scripts, however, VapourSynth support was an afterthought and is therefore experimental, unstable, and “hacky”.
Do not use AvsPmod for VapourSynth scripts unless you have a very good reason!
Please rest assured that the author does not impose any editor on you. Instead we will give callouts for some editors. These will be completely optional.
Video Codecs
Once you are happy with the result of your filter chain, you want to save the output to a file. While it is possible to store the script’s output as raw, uncompressed pixel data, that would result in hundreds of gigabytes of data for a single episode. Because of this, we use video codecs to compress the video.
Lossless compression will still result in very big files, so we have to use lossy compression, which means losing some information in the process. As long as you’re not targeting unreasonable bitrates (say, 50 MB per 24 minute episode), this loss of information should be barely noticeable. This process can be quite difficult, so there will be an entire page dedicated to it.
None of the encoders mentioned here need to be installed. Just save the executable(s) somewhere for later.
For now, all you need to know is which codecs exist and which encoders you want to use.
The codec used most commonly is h.264,
and the most popular h.264 encoder is x264.
The most recent builds can be found on VideoLAN’s site.
Pick the most recent build for your operating system.
At the time of writing this,
win64’s recent build is x264-r2935-545de2f.exe
from 25-Sep-2018.
(Notice: the 10-bit binaries are no longer separate from the 8-bit
as of 24 Dec 2017,
meaning the releases with -10b can be ignored)
You can also build it locally from the public repository.
It used to be that different versions,
namely kmod and tmod,
were required for certain encoding features
such as aq-mode 3.
However, most relevant features have been
added to the upstream x264 builds.
Because of this, kmod is now unmaintained.
tmod is still being updated with changes from new x264 versions,
and it provides some potentially useful parameters such as --fade-compensate
or --fgo (film grain optimization), as well as additional AQ algorithms
(aq2-mode, aq3-mode, and parameters for these),
which are generally regarded as useless for almost all sources.
The current tmod release can be downloaded from the github page.
A newer, more efficient alternative is HEVC, with x265 being the most popular encoder. It is still in active development and aims for 20-50% lower bitrates with the same quality as x264. It does have its flaws, is a lot slower, and not as widely supported by media players as x264, but it can be a viable alternative, especially if small files are important and encoding time is of secondary importance. Note that many groups will require you to use x264, so ask your group leader before picking this encoder.
Other codecs, such as VP9, are generally not used for fansubbing, so they are not listed here. The same is true for experimental codecs like Daala and AV-1. Encoders made for distributed server encoding, such as Intel’s SVT-AV1 will also not be included.
Audio
Audio formats and how to handle them
Depending on the source you’ll be working with, you may encounter many different audio formats.
On Blu-rays, you will most likely find audio encoded losslessly, in the form of either DTS-HD Master Audio, Dolby TrueHD, or PCM. DTS-HD MA and Dolby THD are proprietary codecs that use lossless compression, while PCM is simply raw, uncompressed PCM data. The usual way to handle these is to re-encode them to other formats—either lossless or lossy, depending on your taste. But first, you need to decode them. The recommended tool for that is FFmpeg. You can find Windows builds and Linux packages on FFmpeg’s official site. It doesn’t need to be installed—you can just extract it somewhere. But, since it is useful for many different tasks, adding it to the system PATH is recommended.
When working with WEB and TV sources, you will most likely have only lossy audio available. The most common codecs here are AC-3, E-AC-3 and AAC.
Avoid re-encoding lossily compressed audio
Lossily compressed audio should generally not be re-encoded. The proper way to handle them is to remux (i.e. copy) them to the final file. Re-encoding lossy audio into a different lossy audio format cannot improve the audio quality for barely improved compression (in relation and assuming a lower bitrate), while encoding into a lossless audio format is just wasting bandwidth. Your source file will always have the most data available and using a lossless format for that can not generate data lost from the previous compression from thin air.
Which codecs to use?
Once you have your lossless files decoded, you need to encode them. Depending on your taste, you can choose a lossy or lossless codec. The two most widely accepted codecs in fansubbing community are FLAC (lossless) and AAC (lossy), but recently opus (also lossy) is gaining some popularity, too.
The recommended encoder for FLAC is the official one. Download Windows builds from xiph’s website. Most Linux distributions should have FLAC in their package repositories.
The recommended and most widely used AAC encoder is qaac, available on its official site. Nero and Fraunhofer FDK aren’t really that much worse, so you can use them if you really want. Other AAC encoders are discouraged, since they provide inferior results.
There is also opus, which is gaining some popularity recently. It is currently the most efficient lossy codec, and it’s completely FOSS if you’re into that. The recommended opus encoder is the official one, contained in the opus-tools package.
Just as with video, these encoders don’t need to be installed. Qaac will require some configuration, tho.
Other codecs are generally not recommended. Formats like Monkey’s Audio and TAK provide very little gain over FLAC, while not being as widely supported, and—in the case of TAK—closed source. DTS-HD MA and Dolby THD are much less efficient than FLAC, and are also closed source. MP3 is simply obsolete, and Vorbis has been superseded by opus. DTS and AC-3 provide even worse compression than MP3, and don’t have any reasonable, free encoders. In short—don’t bother, unless you really have to, for some reason.
Lossless or lossy?
This is entirely dependent on you. Some people like the idea of having a (theoretically) perfect copy of the master audio file, don’t mind the increase in size, and state that lossless is the only way to go when archiving. Others prefer smaller file sizes, knowing that the difference—assuming high enough bitrate—won’t be audible anyway. And they both have a point.
So, do some ABX testing and decide for yourself.
However, remember that you should not re-encode lossily compressed audio into a lossless format.
MKVToolNix
You probably have at least three files now—that being the video, audio, and subtitles—and you need to combine all of them into a single file. This process is called muxing.
MKVToolNix is used to mux all parts of the final output into an mkv container. Most people use MKVToolNix GUI, which provides a graphical user interface to mux video, audio, chapters, fonts, and other attachments into an mkv file. Installation instructions for virtually any platform can be found on their website.
It is possible to use other containers, but Matroska has become the standard for video releases due to its versatility and compatibility.
It should be noted that the author strongly disagrees with this sentiment. The two have a lot in common, and any capable AviSynth encoder could reach a similar level in Vapoursynth within a few months, maybe even weeks. At least I’m honest, okay?
Basics and General Workflow
Preparation
downloading a source, looking at the video, some decisions (resolution(s) for the release, audio codec, group-specific requirements)
Writing the Script
imports, source filter (mention lsmash, ffms2), examples for resizing, debanding, AA. with images if possible
Encoding the Result
$ vspipe.exe script.vpy -y - | x264.exe --demuxer y4m --some example --parameters here --output video.264 -
Editors for VapourSynth usually have inbuilt support for encoding
scripts you wrote. Use %encode --y4m <clip_variable> in Yuuno or the GUI
provided by VSEdit.
Transcoding Audio
As said earlier, only qaac will require configuration, everything else can simply be extracted wherever you like. Nonetheless, it is easier to add every binary you use to the PATH environment variable, and the rest of this guide will assume you’ve done exactly that.
Decoding audio with FFmpeg and piping it out
Basic ffmpeg usage is simple. You just need to specify your input file and your desired output file, like this:
ffmpeg -i "input.dtshd" "output.wav"
This command will decode the DTS-HD MA audio file and encode it as a WAVE file. This command doesn’t specify any options so ffmpeg will resort to using its defaults.
For transcoding from DTS-HD MA only one option is needed:
ffmpeg -i "input.dtshd" -c:a pcm_s24le "output.wav"
The -c:a pcm_s24le parameter will tell ffmpeg to encode its output with a depth of 24 bits.
If your source file is 16 bits,
change this parameter to pcm_s16le or simply skip it
because 16 bits is the default.
16 bits per sample are, in almost all situation and most definitely also for anime, more than enough data points to store audio data. Thus, you should use 16 bits per sample in your output formats and only use 24 bits for the intermediate WAVE file, iff your source file already used 24 bits to begin with.
Refer also to the following article:
The command above will decode the source file and save a resulting WAVE file on your drive. You can then encode this WAVE file to a FLAC or AAC file, but there is a faster and more convenient way to do that: piping. Piping skips the process of writing and reading the data to and from a file and simply sends the data straight from one program to another.
To pipe from ffmpeg, specify the output format as WAVE using the -f option,
replace the output filename with a hyphen and place a pipe symbol at the end,
which will be used to separate the ffmpeg command from your encoder command,
like this:
ffmpeg -i "input.dtshd" -c:a pcm_s24le -f wav - | {encoder command}
Encoding to FLAC
To encode to FLAC, we will use the flac command line program:
flac -8 --ignore-chunk-sizes --bps 16 "input.wav" -o "output.flac"
-8 sets the encoding level to 8, the maximum level.
This will result in the best compression,
although at the expense of encoding speed.
FLAC encoding is fast, so just stick with level 8.
--ignore-chunk-sizes is needed
because the WAVE format only supports audio data up to 4 GiB.
This is a way to work around that limitation.
It will ignore the length field in the header of the WAVE file,
allowing the FLAC encoder to read files of any size.
--bps 16 specifies the “bits per sample” to be 16.
As noted earlier,
16 bits are enough for our purposes
and FLAC additionally has the downside
that all 24-bit samples are padded to 32-bit samples in the format,
meaning 25% of the storage used is completely wasted.
To encode audio piped from ffmpeg,
replace the input filename with a hyphen
and place the whole command after the ffmpeg command,
like this:
ffmpeg -i "input.dtshd" -c:a pcm_s24le -f wav - | flac -8 --ignore-chunk-sizes --bps 16 - -o "output.flac"
Encoding to AAC
First, set up qaac:
- Go to its download page and download the newest build
(2.70 at the time of writing) and
makeportable.zip. - Extract the
x64folder wherever you wantqaacto be, then extract contents ofmakeportable.zipinside it. - Download the iTunes setup file (
iTunes64Setup.exe) and move it to thex64folder. - Run the
makeportable.cmdscript - You are done. You can now delete the iTunes installation file.
To encode from a file, use the following command:
qaac64 --tvbr 91 --ignorelength --no-delay "input.wav" -o "output.m4a"
The --tvbr 91 option sets the encoding mode to True Variable Bitrate
(in other words, constant quality)
and sets the desired quality.
qaac has only 15 actual quality steps in intervals of 9 (0, 9, 18, … 127).
The higher the number, the higher the resulting bitrate will be.
The recommended value is 91, which will result in a bitrate
of about 192 kbps on 2.0 channel files,
enough for complete transparency in the vast majority of cases.
--ignorelength performs the same function as --ignore-chunk-sizes in FLAC.
--no-delay is needed for proper audio/video sync1.
To encode audio piped from ffmpeg,
replace the input filename with a hyphen
and place the whole command after the ffmpeg command:
ffmpeg -i "input.dtshd" -c:a pcm_s24le -f wav - | qaac64 --tvbr 91 --ignorelength --no-delay - -o "output.m4a"
Read why in this HydrogenAudio forum post.
Encoding to Opus
Encoding a file with opusenc will look like this:
opusenc --vbr --bitrate 160 --ignorelength "input.wav" "output.opus"
--vbr sets the encoding mode to Variable Bitrate (which is the default but it
never hurts to be explicit),
while --ignorelength does the same thing as in qaac.
As you may have noticed,
opusenc uses bitrate control
rather than some kind of constant quality mode2.
Instead of an abstract number that corresponds to a quality target
like with x264’s CRF mode and qaac’s TVBR mode,
you give the encoder your preferred resulting bitrate and it chooses the constant quality target itself.
The recommended bitrate is 160 kbps for 2.0 channels
and 320 kbps for 5.1.
Encoding audio piped from ffmpeg works the same as for previous encoders—just replace the input filename with a hyphen:
ffmpeg -i "input.dtshd" -c:a pcm_s24le -f wav - | opusenc --vbr --bitrate 160 --ignorelength - "output.opus"
Muxing
mkvtoolnix
Recognizing Video Artifacts
The term “artifact” is used to broadly describe defects or foreign, unwanted elements in a video. There can be any number of causes ranging from lossy compression, improper conversions, to post-processing adjustments like sharpening and resampling. This guide will go over how to identify different types of artifacts, how they occur, and some steps to remove them wherever possible.
Before we dive into this laundry list of problems with no clear solutions, let’s start by recognizing some things that often get mistaken for artifacts.
Not Artifacts
Grain
Aside from film grain, grain is added to videos for a few different reasons. It can be added by the studio to create an effect/change the atmosphere, or it can be added by the disc author/encoder to protect against more harmful artifacts from occurring after encoding (mostly banding and blocking). In excess, it may be considered an artifact, but to us anime encoders of the 21st century it is not an artifact, nor is it something we should be expected to remove.
However, it is often mistaken for “noise”, and for anime and lossy compression, these two things may sometimes be indistinguishable, but the two differ at a fundamental level; grain being added at the discretion of a human being1, and noise being added by lossy compression. See the noise section for more information on the subject.
Badly drawn line art
Bad lines happen, but its hard to say whether it’s worth it to try to fix it. Using awarpsharp or sangnom to fix it will surely lead to disaster.
 Rakudai-Kishi-no-Cavalry-ep.01.png
Chromatic Aberration
 Have I been staring at my monitor for too long?
…and please don’t do this
 notevenonce.jpg
Artifacts
Blocking
DCT block based video compression has come a long way. If you happen to be encoding an MPEG2 TV station or a DVD from a previous decade, you will likely come across something like this:
 Blocky Compression
 Blocky Exaggeration2
From Biamp’s Blog2: “Blocking is known by several names – including tiling, jaggies, mosaicing, pixelating, quilting, and checkerboarding – and it occurs whenever a complex (compressed) image is streamed over a low bandwidth connection (imagine a golf ball being passed through a garden hose). At decompression, the output of certain decoded blocks makes surrounding pixels appear averaged together to look like larger blocks.” (Urban, 2017)
Thankfully most blocking in BDs and web streams nowadays isn’t nearly as bad, and can either be ignored or removed by another stage in your filter chain3. Denoising, debanding, and adding grain will all help to reduce blocking.
Noise
As stated earlier, noise and grain are often used interchangeably. Visually, noise looks uglier and more out of place than grain. It’s less defined and can look blotchy, blocky, or be made up of small dots, whereas grain looks like a proper texture.
In some cases, heavy random grain may be added and then encoded with a low bitrate, resulting in large, noisy, blocky, unstable grain in the video. This is often impossible to remove without noticeable detail loss, and in this case scenefiltering and heavy detail loss are the only two options.
Banding
 Example image for banding
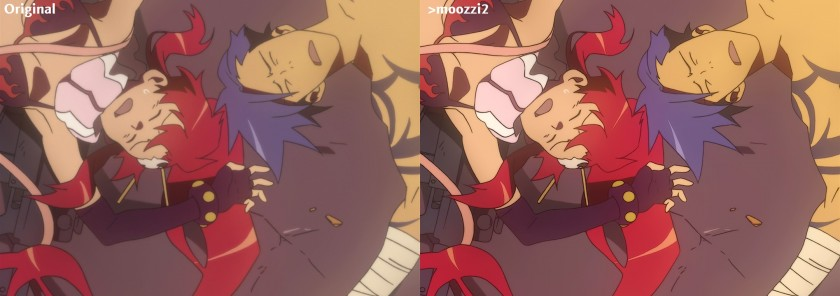
Due to with its many flat areas and smooth gradients, banding is a frequent problem in anime, which is caused by the limits of 8-bit color depth and (especially in low bitrate sources) truncation. The filter GradFun3 is the most common tool for removing it, and is the right tool for the job in average cases.
Some other options are available if this isn’t enough: Particularly large quantization errors, worse banding in dark scenes, and/or banding with grain are cases where experimenting with a few masking/limiting techniques or scene-filtering may be the best option.
Aliasing
Aliasing has a few main causes: interlacing, low bitrate encoding, shitty sharpening, and shitty upscaling (the latter two are often accompanied by ringing).
In the case of resizing, the descale plugin with the right settings may be enough to alleviate the aliasing, but bear in mind that the poorer your source video is, the less effective it will be.
In other cases,
an edge directed interpolation filter,
normally used for deinterlacing,
is used to smooth the edges.
These include nnedi3,
eedi3,
EEDI2,
and sangnom2.
The process involves supersampling and
(re-)interpolating lines in an attempt to minimize detail loss and
maximize continuity.
Masking is very common,
and is always recommended.
There are one or two other methods, the most common of which is a filter called daa. It’s sometimes used, but outside of bad interlacing-related aliasing, it is rarely recommendable.
Ringing
Ringing is something of a blanket term for edge artifacts, including mosquito noise, edge enhancement artifacts, overshoot, or actual ring-like ringing caused by the Gibbs phenomenon.
 Mosquito Noise2
In Blu-ray encodes, the only ringing you’ll be likely to see is upscaling methods such as Lanczos and sharp Bicubic variants, or possibly from badly done sharpening. This is because ringing is primarily a compression artifact, and BDs are generally high bitrate, and even bad BDs don’t tend to ring much.
Thus, you are much more likely to see ringing in low bitrate webrips and MPEG2 TV captures. Despite it being a vastly inferior codec, ringing in MPEG2 sources is actually much easier to deal with than the stubborn ringing in H.264 encodes. In these cases, a simple smoothing based edge-scrubber like HQDeringmod, or a warpsharp-based scrubber similar to EdgeCleaner it has a shitty mask) should all work just fine without too many drawbacks.
In the case of heavily compressed H.264 sources, consider doing a manual masking/limiting/filtering, or scenefiltering with some of HQDeringmod’s safety-checks disabled (change repair from default 24 to 23, or disable entirely)
Haloing
Another edge artifact, this time much cleaner and easier to spot. Halos (especially in anime) are exactly as their title would imply; an even, thick, brightness surrounding lines. In some cases they might even seem like they’re supposed to be there. In Blu-rays this is rarely a problem, but if you do come across it, a masked dehalo_alpha filter such as Fine_Dehalo or a manual filtering of dehalo_alpha with dhhmask (zzfunc.py coming soon™) are recommendable.
Cross-Field Noise
 field-noise.jpg
TODO
Underflow / Overflow
While most of the anime produced
use the YUV 8-bit limited range4,
we occasionally find some videos having the “limited range” flag set
while containing full range content.
This often results in oversaturated colors and weird brightness.
Thus, it is strongly recommended
to check the brightness levels
of the 8-bit source with hist.Levels().
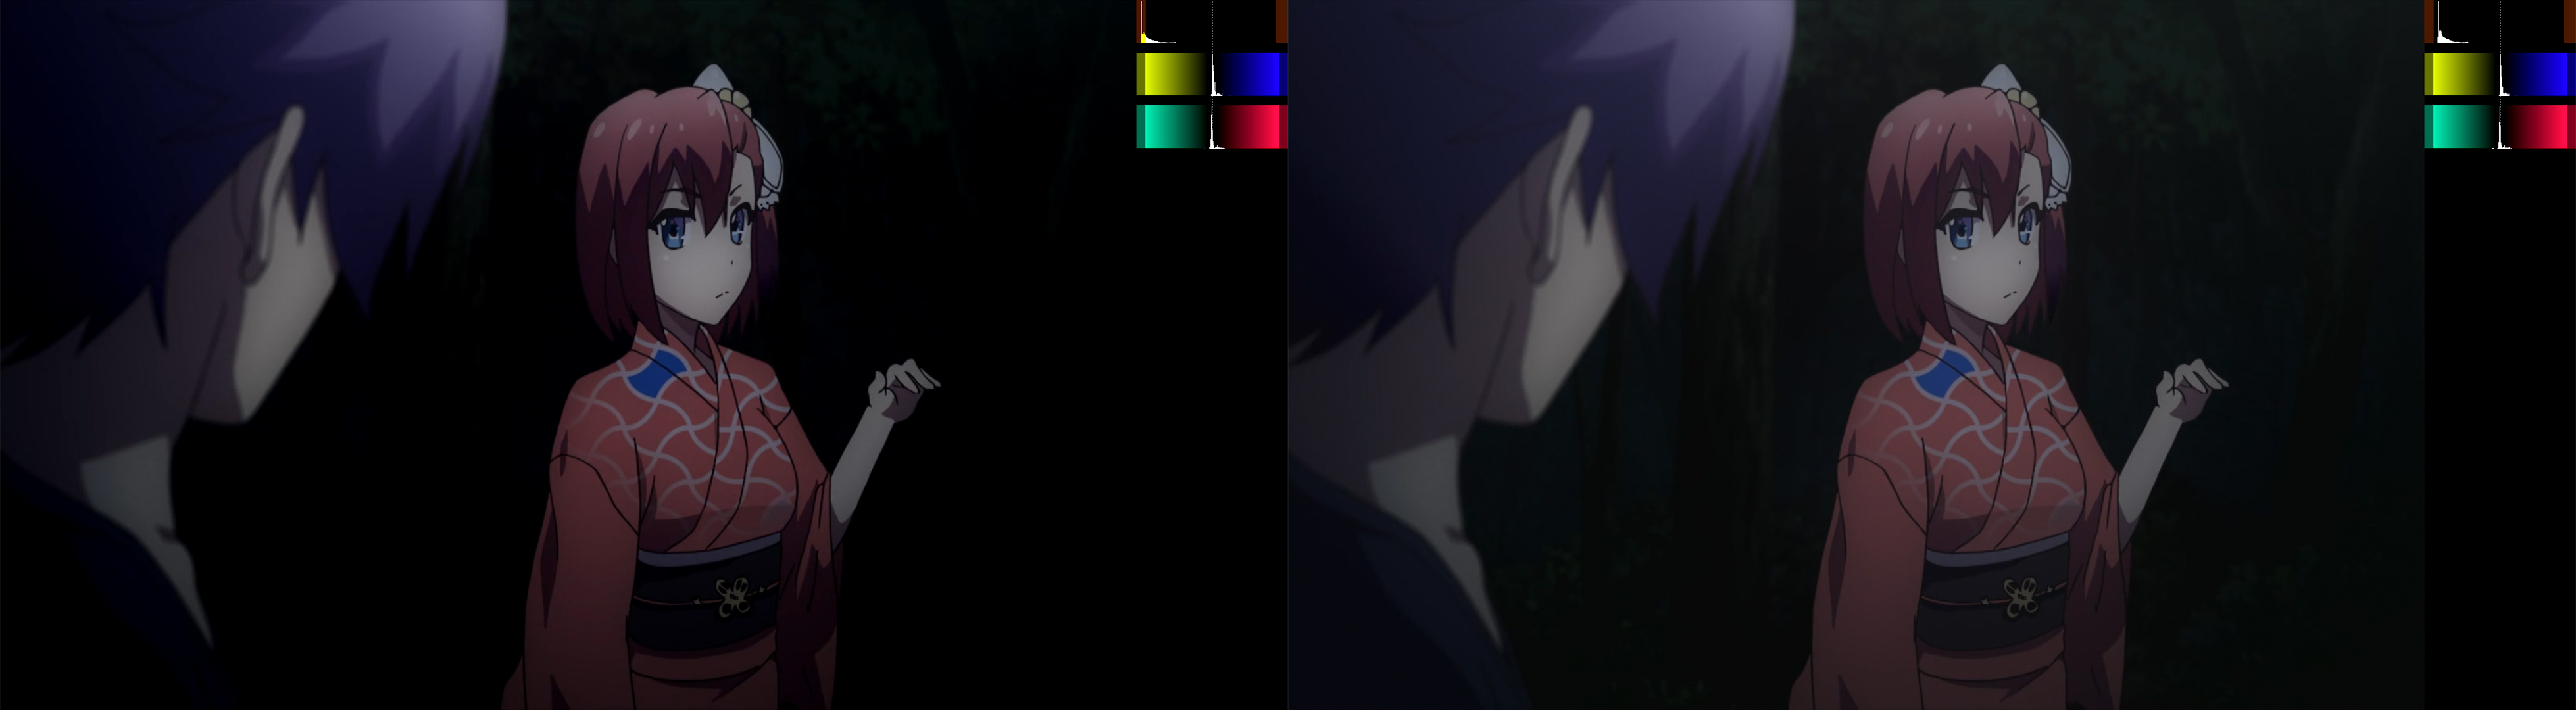 Example of underflow (click for comparison)
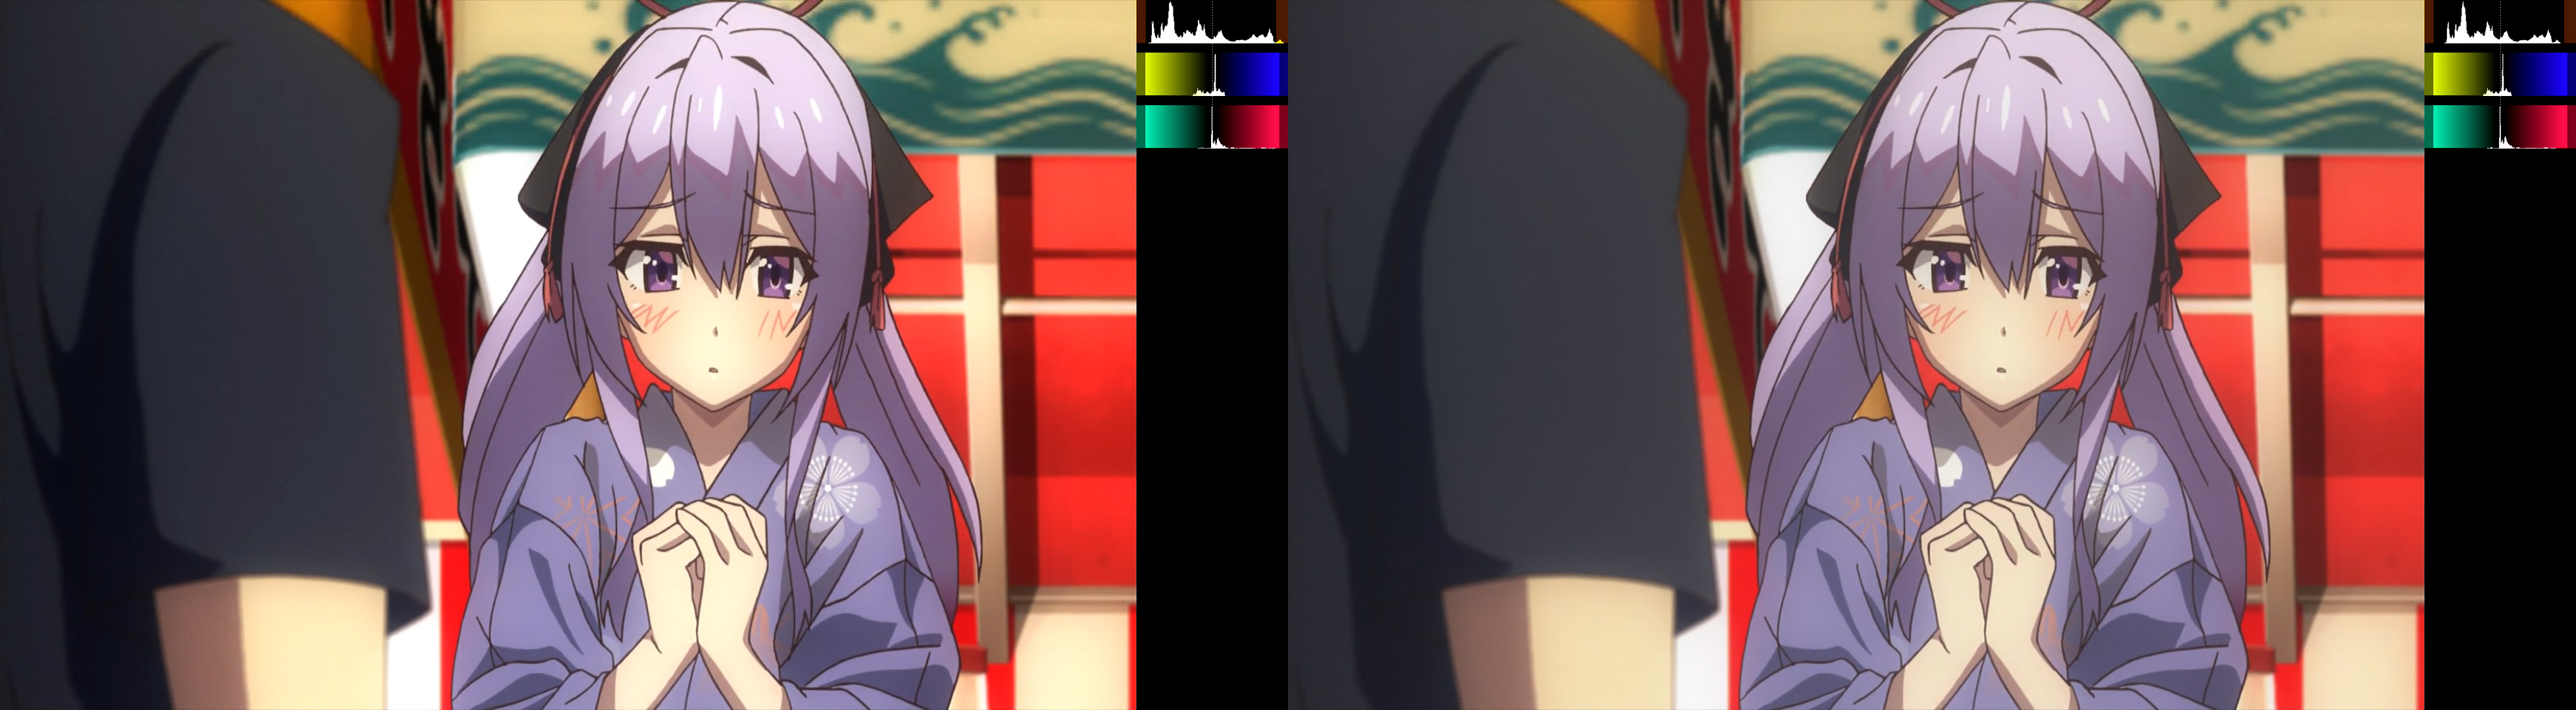 Example of overflow (click for comparison)
To fix this problem,
simply use resize like so:
# Only applies to integer pixel formats, since floating point clips are always full range.
clip = clip.resize.Spline36(range_in_s="full", range_s="limited")
or set the “full range” flag on the video, so the values can be interpreted accordingly. Limited range video is more widely supported and players may ignore the “full range” flag, which results in interpreting full range content in a limited context.
In rare cases,
the issue may be more complicated.
For example,
a video may use faulty levels like 0-235 or 16-255
which are neither full nor limited range.
In such cases or similar,
std.Levels can be utilized to correct the range:
# This only applies to 8 bit clips!
# In this example, the input clip uses 0-235 for luma and 0-240 for chroma.
clip = clip.std.Levels(min_in=0, max_in=235, min_out=16, max_out=235, planes=0)      # y plane
clip = clip.std.Levels(min_in=0, max_in=240, min_out=16, max_out=240, planes=[1,2])  # u&v planes
Because limited precision with only 8 bit per channel may lead to rounding errors quickly, we prefer adjusting the levels (and our filtering in general) with higher precision, such as 16 bit or float (32 bit). In the example above, you would use the following5:
# 16 bit
clip = clip.std.Levels(min_in=0, max_in=235 << 8, min_out=16 << 8, max_out=235 << 8, planes=0)      # y plane
clip = clip.std.Levels(min_in=0, max_in=240 << 8, min_out=16 << 8, max_out=240 << 8, planes=[1,2])  # u&v planes
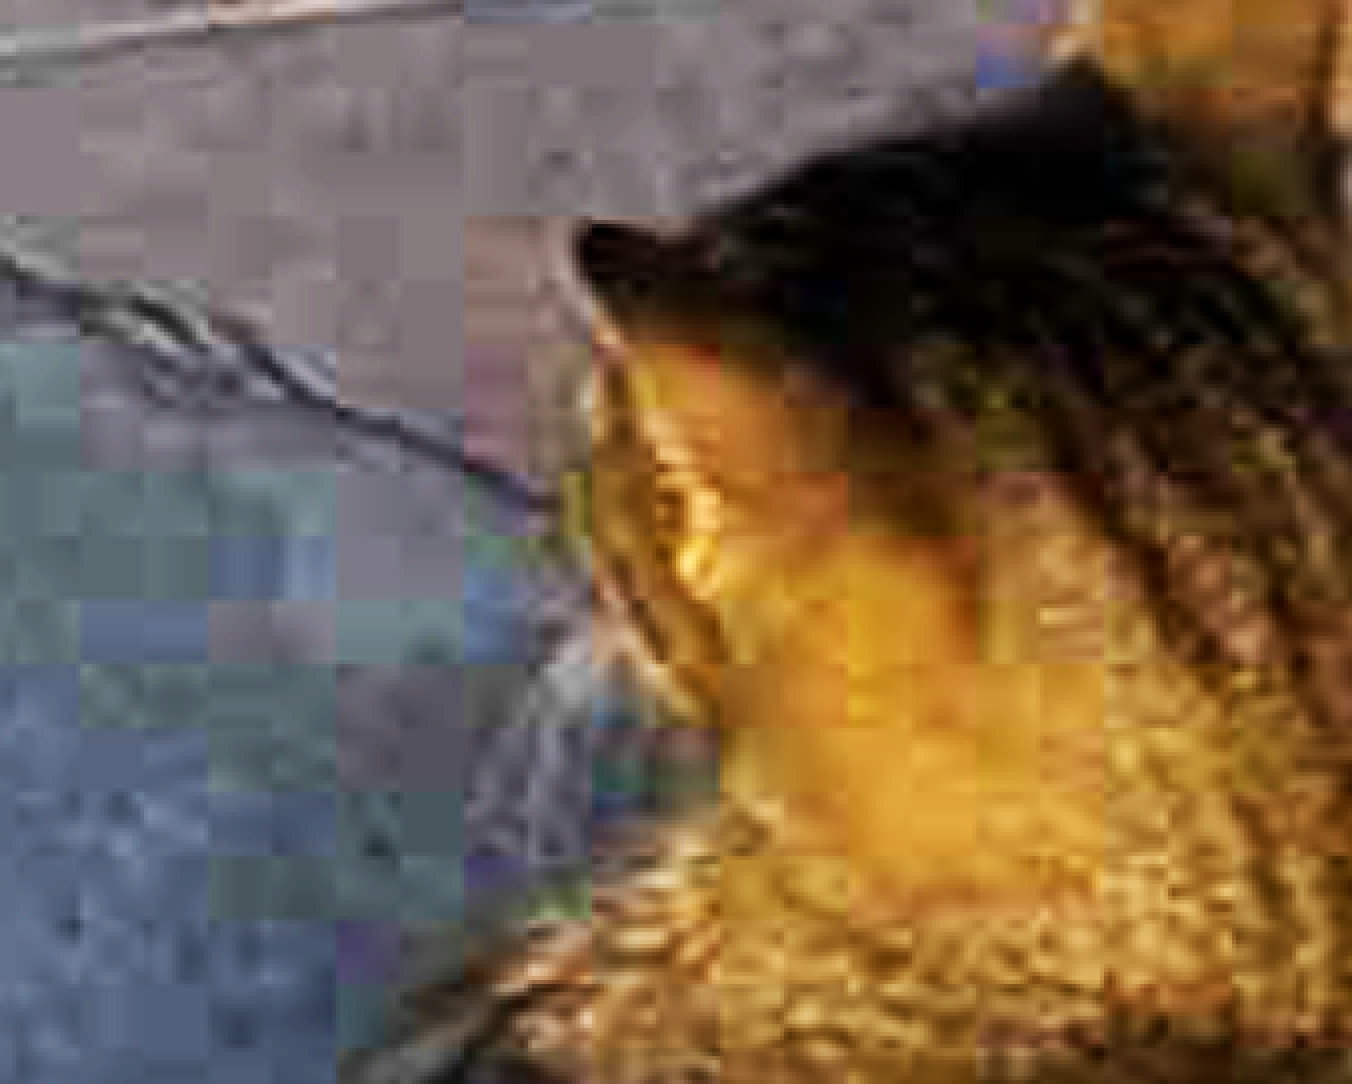
An example for a case, where shifting the levels with 8 bit precision leads to rounding errors that may result in banding and other weird artifacts, can be seen below.
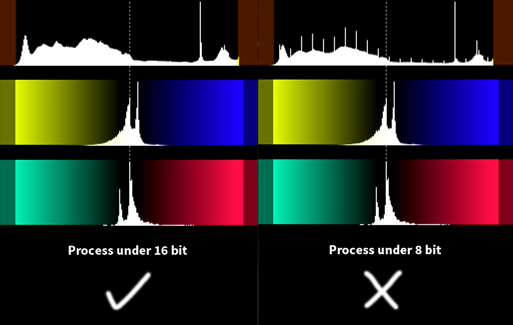 When you see a histogram like this, increase precision.
At least, in digital anime. Actual grain is different but you most likely aren’t encoding shows from the 90s so who cares.
Urban, J. (2017, February 16). Understanding Video Compression Artifacts. Retrieved from http://blog.biamp.com/understanding-video-compression-artifacts/
Blocking may also occur for other reasons other than compression data loss. Image re-construction with padding can cause very similar looking effects, although this is irrelevant for fansubbing source videos.
The 8-bit limited range (used in rec.601, rec.709, and BT.2020/2100) only defines values within \([16,~235]\) for the Y and \([16,~240]\) for the U and V planes. This means that Y=16 is considered full black and Y=235 full white, while any values outside of that range are clamped virtually (during rendering). U and V behave analogously.
The limited ranges in different precisions are shifted by (multiplied by 2 to the power of) the added bits. For 12-bit, for example, you multiply by \(2^{12-8}\), resulting in \([256,~3760]\) and \([256,~3840]\) respectively. The maximum value in full range is obviously the highest unsigned integer value, so \(2^{12}-1\).
Scenefiltering
Scenefiltering can be hazardous to both your mind and body if used extensively. Avoid scenefiltering if possible.
If you’re an aspiring young encoder or someone who has been around fansubbing for a while, you’ve probably heard the term “scenefiltering”. But what is scenefiltering? As the name suggests, it is simply filtering different scenes or frames of a video clip distinctly.
Creating the base filters
Normally, if you have a source that has great video quality with minimal video artifacts, you can use a simple chain of filters on the entire video without any concern. However, if you have a more complex source with a myriad of video artefacts, you probably don’t want to use the same filters everywhere. For instance, one scene could have heavy banding while another scene might have strong aliasing. If you were to fix both of these issues by using strong filtering over the entire video, it would likely result in detail loss in other scenes, which you do not want. This is where scenefiltering comes in.
As always, you start by importing the VapourSynth module and loading your video source:
import vapoursynth as vs  # this can look different based on your editor
core = vs.core

src = core.lsmas.LWLibavSource("source.m2ts")
Next, you need to choose what filtering will be done to the entire clip. Some filtering—like resizing in this example—may need to be put before any other filtering. At this stage, you can also come up with the default filters that need to be in a certain order, but will still be applied to the entire clip. If you can’t come up with anything suitable, don’t fret; you’ll have plenty more chances to filter later.
filtered = core.resize.Bilinear(src, width=1280, height=720)

# will occur at the deband stage, but for entire clip
default_deband = deband(filtered)
Now that you have your common filtering down, you need to create some base filter chains. Go through some random scenes in your source and write down parts of the filtering that best suits those scenes. You should separate these as variables with proper names and sorting (group filters by their type) to keep everything neat and clean. If you do this part well, you will save yourself a lot of time later on, so take your time. At this point, your script should look something like this:
import vapoursynth as vs
core = vs.core

src = core.lsmas.LWLibavSource("source.m2ts")
resized = core.resize.Bilinear(src, width=1280, height=720)

light_denoise = some_denoise_filter(resized)
heavy_denoise = some_other_denoise_filter(resized)

denoised = ...

aa = antialiasing(denoised)

aa = ...

default_deband = deband(aa)
light_deband   = deband1(aa)
medium_deband  = deband2(aa)

debanded = ...
Adding the frame ranges
Once you’ve done all of that, you’re done with filtering your source—at
least for the most part. Now all you need to do is add
ReplaceFramesSimple calls. For this, you need either the
plugin RemapFrames or
the native Python version in
fvsfunc1.
Rfs is a shorthand for ReplaceFramesSimple
and fvsfunc has the alias rfs.
import vapoursynth as vs
core = vs.core

src = core.lsmas.LWLibavSource("source.m2ts")
resized = core.resize.Bilinear(src, width=1280, height=720)

### Denoising
light_denoise   = some_denoise_filter(resized)
heavy_denoise   = some_other_denoise_filter(resized)
heavier_denoise = some_stronger_denoise_filter(resized)

denoised = core.remap.Rfs(resized, light_denoise, mappings="")
denoised = core.remap.Rfs(denoised, heavy_denoise, mappings="")
denoised = core.remap.Rfs(denoised, heavier_denoise, mappings="")

### Anti-aliasing
eedi2_aa  = eedi2_aa_filter(denoised)
nnedi3_aa = nnedi3_aa_filter(denoised)

aa = core.remap.Rfs(denoised, eedi2_aa, mappings="")
aa = core.remap.Rfs(aa, nnedi3_aa, mappings="")

### Debanding
default_deband = default_deband(aa)
light_deband   = deband1(aa)
medium_deband  = deband2(aa)

debanded = default_deband  # will apply filter to the entire clip
debanded = core.remap.Rfs(debanded, light_deband, mappings="")
debanded = core.remap.Rfs(debanded, med_deband, mappings="")
So you created all your base filters and added Rfs calls. Now what? You still have to perform the most tedious part of this entire process—adding frame ranges to those calls. The basic workflow is quite simple:
-
Go to the start of the scene. View the next 2-3 frames. Go to the end of the scene. View the previous 2-3 frames. Based on this, decide on your filtering for the particular scene. If still in doubt, look at other frames in the scene. Sometimes, you will find that different frames in the same scene require different filtering, but this is quite uncommon.
-
Now that you know what filter to use, simply add the frame range to the respective Rfs call. To add a frame range to Rfs, you need to enter it as a string in the
mappingsparameter. The format for the string is[start_frame end_frame]. If you only want to add a single frame, the format isframe_number. An example should help you understand better:# The following replaces frames 30 to 40 (inclusive) and frame 50 # of the base clip with the filtered clip. filtered = core.remap.Rfs(base, filtered, mappings="[30 40] 50") -
Repeat with the next scene.
When scenefiltering, it is good practice to comment out Rfs calls you’re currently not using because they just make your script slower and eat up memory.
This step can take anywhere from a few minutes to hours, depending on the encoder and the source. Most of the time, the same filters can be reused every episode with some minor changes here and there.
Now you might ask, “Why did I have to create base filters for
everything?” The answer is that these base filters allow other filters
to be added on top of them. Let’s say a scene requires light_denoise
but also needs medium_deband on top of that. Just put the same frame
ranges in their Rfs calls and watch it happen. What if a scene requires
denoising stronger than heavier_denoise ? Simple. Add another denoising
filter instead of heavier_denoise like so:
super_heavy_denoise = ultra_mega_super_heavy_denoise(filtered)

filtered = core.remap.Rfs(filtered, super_heavy_denoise, mappings="[x y]")
Using different denoisers on that same frame range is also possible, but always consider the impacts on performance. Calling a strong, slow denoise filter might still be faster (and better-looking) than calling a weak, faster filter multiple times.
Editor shortcuts / tips
If using VSEdit as your editor,
it can be helpful to use the
built-in bookmark functionality
to find the frame ranges of each scene.
There is a small script that can generate
these bookmarks from your clip inside of VSEdit.
If you already have a keyframe file
(WWXD qp-file or Xvid keyframes)
you can instead use the convert function.
# Editing a script called 'example01.vpy'
import ...
from vsbookmark import generate

generate(clip, 'example01')
#convert('keyframes.txt', 'example01')
clip.set_output()
When previewing your clip, there will now be bookmarks generated on the timeline allowing you to skip to the next scene using the GUI buttons.
The python script may be slower than the plug-in due to the way it calls std.Splice to combine multiple re-mappings. The plug-in on the other hand, directly serves the frames of the second clip, with no calls to Splice. The speed difference will likely only be noticeable with a large amount of re-mappings. So, for the average script, it should be unnoticeable.
Masking, Limiting, and Related Functions
There are filters which change the video in various ways, and then there are ways to change the filtering itself. There are likely hundreds of different techniques at your disposal for various situations, using masks to protect details from smoothing filters, blending two clips with different filtering applied, and countless others—many of which haven’t been thought of yet. This article will cover:
- Masking and Merging
- Limiting
- Reference clips
- Expressions and Lookup Tables
- Runtime functions
- Pre-filtering
Masking
Masking refers to a broad set of techniques used to merge multiple clips. Usually one filtered clip is merged with a source clip according to an overlay mask clip. A mask clip specifies the weight for each individual pixel according to which the two clips are merged; see MaskedMerge for details.
In practice, masks are usually used to protect details, texture, and/or edges from destructive filtering effects like smoothing; this is accomplished by masking the areas to protect, e.g. with an edgemask, and merging the filtered clip with the unfiltered clip according to the mask, such that the masked areas are taken from the unfiltered clip, and the unmasked areas are taken from the filtered clip. In effect, this applies the filtering only to the unmasked areas of the clip, leaving the masked details/edges intact.
Mask clips are usually grayscale,
i.e. they consist of only one plane and thus contain no color information.
In VapourSynth, such clips use the color family GRAY
and one of these formats:
GRAY8 (8 bits integer),
GRAY16 (16 bits integer),
or GRAYS (single precision floating point).
std.MaskedMerge
This is the main function for masking that performs the actual merging. It takes three clips as input: two source clips and one mask clip. The output will be a convex combination of the input clips, where the weights are given by the brightness of the mask clip. The following formula describes these internals for each pixel:
$$
\mathrm{output} = \mathrm{clipa} \times (\mathit{maxvalue} - \mathrm{mask}) + (\mathrm{clip~b} \times \mathrm{mask})
$$
where \(\mathit{max~value}\) is 255 for 8-bit.
In simpler terms: for brighter areas in the mask, the output will come from clip b, and for the dark areas, it’ll come from clip a. Grey areas result in an average of clip a and clip b.
If premultiplied is set to True,
the equation changes as follows:
$$
\mathrm{output} = \mathrm{clipa} \times (\mathit{maxvalue} - \mathrm{mask}) + \mathrm{clip~b}
$$
Manipulating Masks
Building precise masks that cover exactly what you want is often rather tricky. VapourSynth provides basic tools for manipulating masks that can be used to bring them into the desired shape:
std.Minimum/std.Maximum
The Minimum/Maximum operations replace each pixel with the smallest/biggest value in its 3x3 neighbourhood. The 3x3 neighbourhood of a pixel are the 8 pixels directly adjacent to the pixel in question plus the pixel itself.
 Illustration of the 3x3 neighborhood
The Minimum/Maximum filters look at the 3x3 neighbourhood of each pixel in the input image and replace the corresponding pixel in the output image with the brightest (Maximum) or darkest (Minimum) pixel in that neighbourhood.
Maximum generally expands/grows a mask because all black pixels adjacent to white edges will be turned white, whereas Minimum generally shrinks the mask because all white pixels bordering on black ones will be turned black.
See the next section for usage examples.
Side note:
In general image processing,
these operations are known as Erosion (Minimum)
and Dilation (Maximum).
Maximum/Minimum actually implement only a specific case
where the structuring element is a 3x3 square.
The built-in morpho plug-in implements the more general case
in the functions morpho.Erode and morpho.Dilate
which allow finer control over the structuring element.
However, these functions are significantly slower than
std.Minimum and std.Maximum.
std.Inflate/std.Deflate
TODO
std.Binarize
Split the luma/chroma values of any clip into one of two values, according to a fixed threshold. For instance, binarize an edgemask to white when edge values are at or above 24, and set values lower to 0:
mask.std.Binarize(24, v0=0, v1=255)
For methods of creating mask clips, there are a few general categories…
Line masks
These are used for normal edge detection, which is useful for processing edges or the area around them, like anti-aliasing and deringing. The traditional edge detection technique is to apply one or more convolutions, focused in different directions, to create a clip containing what you might call a gradient vector map, or more simply a clip which has brighter values in pixels where the neighborhood dissimilarity is higher. Some commonly used examples would be Prewitt (core), Sobel (core), and kirsch (kagefunc).
There are also some edge detection methods that use pre-filtering when generating the mask. The most common of these would be TCanny, which applies a Gaussian blur before creating a 1-pixel-thick Sobel mask. The most noteworthy pre-processed edge mask would be kagefunc’s retinex_edgemask filter, which at least with cartoons and anime, is unmatched in its accuracy. This is the mask to use if you want edge masking with ALL of the edges and nothing BUT the edges.
Another edge mask worth mentioning is the mask in dehalohmod, which is a black-lineart mask well-suited to dehalo masking. Internally it uses a mask called a Camembert to generate a larger mask and limits it to the area affected by a line-darkening script. The main mask has no name and is simply dhhmask(mode=3).
For more information about edgemasks, see kageru’s blog post.
The range mask (or in masktools, the “min/max” mask) also fits into this category. It is a very simple masking method that returns a clip made up of the maximum value of a range of neighboring pixels minus the minimum value of the range, as so:
clipmax = core.std.Maximum(clip)
clipmin = core.std.Minimum(clip)
minmax = core.std.Expr([clipmax, clipmin], 'x y -')
The most common use of this mask is within GradFun3. In theory, the neighborhood variance technique is the perfect fit for a debanding mask. Banding is the result of 8 bit color limits, so we mask any pixel with a neighbor higher or lower than one 8 bit color step, thus masking everything except potential banding. But alas, grain induces false positives and legitimate details within a single color step are smoothed out, therefore debanding will forever be a balancing act between detail loss and residual artifacts.
Example: Build a simple dehalo mask
Suppose you want to remove these halos:
 Screenshot of the source.
 Point-enlargement of the halo area.
(Note that the images shown in your browser are likely resized poorly; you can view them at full size in this comparison.)
Fortunately, there is a well-established script that does just that: DeHalo_alpha.
However, we must be cautious in applying that filter, since, while removing halos reliably, it’s extremely destructive to the lineart as well. Therefore we must use a dehalo mask to protect the lineart and limit the filtering to halos.
A dehalo mask aims to cover the halos but exclude the lines themselves, so that the lineart won’t be blurred or dimmed. In order to do that, we first need to generate an edgemask. In this example, we’ll use the built-in Sobel function. After generating the edge mask, we extract the luma plane:
mask = core.std.Sobel(src, 0)
luma = core.std.ShufflePlanes(mask, 0, colorfamily=vs.GRAY)
luma
Next, we expand the mask twice, so that it covers the halos.
vsutil.iterate is a function in vsutil
which applies the specified filter a specified number of times
to a clip—in this case it runs std.Maximum 2 times.
mask_outer = vsutil.iterate(luma, core.std.Maximum, 2)
mask_outer
Now we shrink the expanded clip back
to cover only the lineart.
Applying std.Minimum twice
would shrink it back to the edge mask’s original size,
but since the edge mask covers part of the halos too,
we need to erode it a little further.
The reason we use mask_outer as the basis and shrink it thrice,
instead of using mask and shrinking it once,
which would result in a similar outline,
is that this way,
small adjacent lines with gaps in them
(i.e. areas of fine texture or details),
such as the man’s eyes in this example,
are covered up completely,
preventing detail loss.
mask_inner = vsutil.iterate(mask_outer, core.std.Minimum, 3)
mask_inner
Now we subtract the outer mask covering the halos and the lineart from the inner mask covering only the lineart. This yields a mask covering only the halos, which is what we originally wanted:
halos = core.std.Expr([mask_outer, mask_inner], 'x y -')
halos
Next, we do the actual dehaloing:
dehalo = hf.DeHalo_alpha(src)

dehalo
Lastly, we use MaskedMerge to merge only the filtered halos into the source clip, leaving the lineart mostly untouched:
masked_dehalo = core.std.MaskedMerge(src, dehalo, halos)

masked_dehalo
Diff masks
A diff(erence) mask is any mask clip generated using the variance of two clips. There are many different ways to use this type of mask: limiting a difference to a threshold, processing a filtered difference itself, or smoothing → processing the clean clip → overlaying the original grain. They can also be used in conjunction with line masks, for example: kagefunc’s hardsubmask uses a special edge mask with a diff mask, and uses core.misc.Hysteresis to grow the line mask into diff mask.
Example: Create a descale mask for white non-fading credits with extra protection for lines (16 bit input)
src16 = kgf.getY(last)
src32 = fvf.Depth(src16, 32)

standard_scale = core.resize.Spline36(last, 1280, 720, format=vs.YUV444P16, resample_filter_uv='spline16')

inverse_scale = core.descale.Debicubic(src32, 1280, 720)
inverse_scale = fvf.Depth(inverse_scale, 16)

#absolute error of descaling
error = core.resize.Bicubic(inverse_scale, 1920, 1080)
error = core.std.Expr([src, error], 'x y - abs')

#create a light error mask to protect smaller spots against halos aliasing and rings
error_light = core.std.Maximum(error, coordinates=[0,1,0,1,1,0,1,0])
error_light = core.std.Expr(error_light, '65535 x 1000 / /')
error_light = core.resize.Spline36(error_light, 1280, 720)

#create large error mask for credits, limiting the area to white spots
#masks are always full-range, so manually set fulls/fulld to True or range_in/range to 1 when changing bitdepth
credits = core.std.Expr([src16, error], 'x 55800 > y 2500 > and 255 0 ?', vs.GRAY8)
credits = core.resize.Bilinear(credits, 1280, 720)
credits = core.std.Maximum(credits).std.Inflate().std.Inflate()
credits = fvf.Depth(credits, 16, range_in=1, range=1)

descale_mask = core.std.Expr([error_light, credits], 'x y -')

output = kgf.getY(standard_scale).std.MaskedMerge(inverse_scale, descale_mask)
output = muvf.MergeChroma(output, standard_scale)
Single and multi-clip adjustments with std.Expr and friends
VapourSynth’s core contains many such filters, which can manipulate one to three different clips according to a math function. Most, if not all, can be done (though possibly slower) using std.Expr, which will be covered at the end of this sub-section.
std.MakeDiff and std.MergeDiff
Subtract or add the difference of two clips, respectively.
These filters are peculiar in that they work differently in
integer and float formats,
so for more complex filtering
float is recommended whenever possible.
In 8 bit integer format where neutral luminance (gray) is 128,
the function is \(\mathrm{clipa} - \mathrm{clipb} + 128\) for MakeDiff
and \(\mathrm{clipa} + \mathrm{clipb} - 128\) for MergeDiff,
so pixels with no change will be gray.
The same is true of 16 bit and 32768.
The float version is simply \(\mathrm{clipa} - \mathrm{clipb}\) so in 32 bit
the difference is defined normally,
negative for dark differences,
positive for bright differences,
and null differences are zero.
Since overflowing values are clipped to 0 and 255, changes greater than 128 will be clipped as well. This can be worked around by re-defining the input clip as so:
smooth = core.bilateral.Bilateral(src, sigmaS=6.4, sigmaR=0.009)
noise = core.std.MakeDiff(src, smooth) # subtract filtered clip from source leaving the filtered difference
smooth = core.std.MakeDiff(src, noise) # subtract diff clip to prevent clipping (doesn't apply to 32 bit)
std.Merge
This function is similar to MaskedMerge, the main difference being that a constant weight is supplied instead of a mask clip to read the weight from for each pixel. The formula is thus just as simple:
$$
\mathrm{output} = \mathrm{clipa} \times (\mathit{maxvalue} - \mathrm{weight}) + (\mathrm{clip~b} \times \mathrm{weight})
$$
It can be used to perform a weighted average of two clips or planes.
std.Expr
TODO
std.Lut and std.Lut2
May be slightly faster than Expr in some cases, otherwise they can’t really do anything that Expr can’t. You can substitute a normal Python function for the RPN expression, though, so you may still find it easier. See link for usage information.
Limiting
TODO
Referencing
TODO
Runtime filtering with FrameEval
TODO
Example: Strong smoothing on scene changes (i.e. for MPEG-2 transport streams)
from functools import partial

src = core.d2v.Source()
src = ivtc(src)
src = haf.Deblock_QED(src)

ref = core.rgvs.RemoveGrain(src, 2)

# xvid analysis is better in lower resolutions
first = core.resize.Bilinear(ref, 640, 360).wwxd.WWXD()
# shift by one frame
last = core.std.DuplicateFrames(first, src.num_frames - 1).std.DeleteFrames(0)

# copy prop to last frame of previous scene
propclip = core.std.ModifyFrame(first, clips=[first, last], selector=shiftback)

def shiftback(n, f):
    both = f[0].copy()
    if f[1].props.SceneChange == 1:
        both.props.SceneChange = 1
    return both

def scsmooth(n, f, clip, ref):
    if f.props.SceneChange == 1:
        clip = core.dfttest.DFTTest(ref, tbsize=1)
    return clip

out = core.std.FrameEval(src, partial(scsmooth, clip=src, ref=ref), prop_src=propclip)
Pre-filters
TODO
Example: Deband a grainy clip with f3kdb (16 bit input)
src16 = last
src32 = fvf.Depth(last, 32)

# I really need to finish zzfunc.py :<
minmax = zz.rangemask(src16, rad=1, radc=0)

#8-16 bit MakeDiff and MergeDiff are limited to 50% of full-range, so float is used here
clean = core.std.Convolution(src32, [1,2,1,2,4,2,1,2,1]).std.Convolution([1]*9, planes=[0])
grain = core.std.Expr([src32, clean32], 'x y - 0.5 +')

clean = fvf.Depth(clean, 16)
deband =core.f3kdb.Deband(clean, 16, 40, 40, 40, 0, 0, keep_tv_range=True, output_depth=16)

#limit the debanding: f3kdb becomes very strong on the smoothed clip (or rather, becomes more efficient)
#adapt strength according to a neighborhood-similarity mask, steadily decreasing strength in more detailed areas
limited = zz.AdaptiveLimitFilter(deband, clean, mask=minmax, thr1=0.3, thr2=0.0, mthr1=400, mthr2=700, thrc=0.25)

output = fvf.Depth(limited, 32).std.MergeDiff(grain)
Descaling
The ability to descale is a wonderful tool to have in any encoder’s arsenal. You may have heard before that most anime are not native 1080p, but a lower resolution. But how do we make use of that? How do you find the native resolution and reverse the upscale?
When and where to descale
There are many circumstances where descaling might prove beneficial. For example, say you’ve got a very blurry Blu-ray source. Rather than sharpening it, you might want to consider checking if it’s possible to descale it and maybe alleviate a lot of the blur that way. Or the opposite: say you’ve got a source full of ringing. It might have been upscaled using a very sharp kernel, so it’s worth a try to see if it can be descaled. It’s no surprise that descaling tends to offer far better lineart than usual rescaling does.
However, descaling is not always an option. The worse your source is, the less likely it is that descaling will yield better results than a simple resample. If you’ve got a source full of broken gradients or noise patterns, like your average simulcast stream, descaling might only hurt the overall quality. Sadly, sources with a lot of post-processing might also prove tough to properly descale without dabbling with specific masks. However, as long as you’ve got a source with nice, clean lineart, descaling might be a viable option, and possibly nullify the need for a lot of other filtering.
Preparation
To prepare for figuring out the native resolution, you’ll want to use getnative, a Python script designed for figuring out the resolution a show was animated at. For the actual descaling, make sure to grab BluBb-mADe’s descale.
One important thing to keep in mind when descaling is that you will never find “the perfect descaling settings”. Even if you find the exact settings that the studio used, you won’t be able to get a frame-perfect replica of the original frame. This is because the best available sources to consumers, usually Blu-rays, aren’t lossless. There are always going to be some differences from the original masters which makes it impossible to perfectly descale something. However, usually those differences are so small that they’re negligible. If you run into a case where you can’t find any low relative error spikes, descaling can be highly destructive. It’s instead recommended to resize as you would normally, or to not mess with scaling at all.
Finding out the native resolution
To figure out what the native resolution of an anime is, first you need a good frame to test. Ideally, you’ll want a bright frame with as little blur as possible of high quality (Blu-ray or very good webstreams). It also helps to not have too many post-processed elements in the picture. Whilst it is most definitely possible to get pretty good results with “bad” frames, it’s generally better to use good frames whenever possible.
Here are some examples of “bad” frames.
 Manaria Friends — 01 (frame 1)
This picture is dark. It also has some effects over it.
 Manaria Friends — 01 (frame 2)
This picture is also very dark and has even more effects over it.
 Manaria Friends — 01 (frame 3)
Heavy dynamic grain will almost always give bad results.
 Manaria Friends — 01 (frame 4)
This is a nice frame to use as reference. The background is a bit blurry, but it isn’t full of effects and is fairly bright. The lineart is very clear.
We will now make use of the getnative.py script to figure out what resolution this anime was produced at. Run the following in your terminal:
$ python getnative.py "descale_manaria04.png"
It should show the following:
Using imwri as source filter
501/501
Kernel: bicubic AR: 1.78 B: 0.33 C: 0.33
Native resolution(s) (best guess): 878p
done in 18.39s
If you check the directory where you executed the script, you will find a new folder called “getnative”. You can find the following graph in there as well:
 Manaria Friends — 01 (frame 4 getnative graph)
The X-axis shows the resolutions that were checked, and the Y-axis shows the relative error. The relative error refers to the difference between the original frame and the rescaled frame. What you’re looking for are the spikes that show a low relative error. In this case it very clearly points to 878p.
As a sidenote, it’s important to keep in mind that this script can’t find native 1080p elements. This is because it descales the frame and re-upscales it afterwards to determine the relative error. You can’t descale to 1080p if the frame is already 1080p. If you have reason to believe that your show might be native 1080p, you’ve got to go with your gut.
 Date A Live III — 01 (getnative graph)
An example of a graph for a native 1080p show.
You may notice that the line swerves a bit in the first graph. There are going to be cases where you will get odd graphs like these, so it’s important to know when the results are safe enough to descale or when they’re too risky. Here is an example of a “bad” graph:
 Miru Tights — 02 (getnative graph)
Output:
Kernel: bicubic AR: 1.78 B: 0.33 C: 0.33
Native resolution(s) (best guess): 869p, 848p
The script has determined that it’s likely either 848p or 869p. However, there are no clear spikes in this graph like there was in the Manaria Friends one. The results are not clear enough to work off of. Here’s another example:
 Black Lagoon (getnative graph)
Output:
Kernel: bicubic AR: 1.78 B: 0.33 C: 0.33
Native resolution(s) (best guess): 1000p, 974p, 810p
This graph has a lot of unnatural swerves and it’s impossible to determine what the native resolution is.
Another pitfall you’ve got to watch out for is checking the results of a frame with letterboxing.
 Kizumonogatari I
 Kizumonogatari I (getnative graph)
You will have to crop them beforehand or they will return odd graphs like this.
For a change of pace, let’s look at a good graph.
 Aikatsu Friends! — NCOP (getnative graph)
Output:
Kernel: bicubic AR: 1.78 B: 0.33 C: 0.33
Native resolution(s) (best guess): 810p
The results are very clear. There are a couple of deviations, but there’s a very clear spike going down to 810p. This is a good result for testing out varying kernels.
Descaling
Now it’s time to actually start descaling. Open up your VapourSynth editor of choice, and import the clip:
src = core.lsmas.LWLibavSource("BDMV/[BDMV][190302][マナリアフレンズ I]/BD/BDMV/STREAM/00007.m2ts")
The next issue is figuring out what was used to upscale the show. By default, getnative.py checks with Mitchell-Netravali (bicubic b=1/3, c=1/3). However, it might have also been upscaled using other kernels.
Here is a list of some common kernels and values.
- Lanczos
- Spline16
- Spline36
- Bilinear
- Bicubic b=1, c=0 (B-Spline)
- Bicubic b=0, c=0 (Hermite)
- Bicubic b=1/3, c=1/3 (Mitchell-Netravali)
- Bicubic b=0, c=0.5 (Catmull-Rom)
- Bicubic b=0, c=1 (Sharp Bicubic)
The best way to figure out what is used is to simply try out a bunch of different kernels and use your eyes. Check for common scaling-related artifacting, like haloing, ringing, aliasing, etc.
For bicubic, it is important to keep in mind that you will typically find that the values match the following mathematical expressions:
b + 2c = 1b = 0, c = Xb = 1, c = 0
Whilst this isn’t a 100% guarantee, it is the most common approach to rescaling using bicubic, so it’s worth keeping in mind.
Here’s an example of the previous frame
when descaled using various kernels and settings
(note that descale requires either GrayS, RGBS, or YUV444PS.
I’ll be using split and join from kagefunc to split the planes
and then join them again in this example,
and get_w from vsutil to calculate the width)1:
from vapoursynth import core
import vsutil
import kagefunc as kgf
import fvsfunc as fvf

src = core.lsmas.LWLibavSource("BDMV/[BDMV][190302][マナリアフレンズ I]/BD/BDMV/STREAM/00007.m2ts")
src = fvf.Depth(src, 32)

y, u, v = kgf.split(src)
height = 878
width = vsutil.get_w(height)

# Bilinear
descale_a = core.descale.Debilinear(y, width, height).resize.Bilinear(1920, 1080)
descale_a = kgf.join([descale_a, u, v])
# Mitchell-Netravali
descale_b = core.descale.Debicubic(y, width, height, b=1/3, c=1/3).resize.Bicubic(1920, 1080, filter_param_a=1/3, filter_param_b=1/3)
descale_b = kgf.join([descale_b, u, v])
# Sharp Bicubic
descale_c = core.descale.Debicubic(y, width, height, b=0, c=1).resize.Bicubic(1920, 1080, filter_param_a=0, filter_param_b=1)
descale_c = kgf.join([descale_c, u, v])
# B-Spline
descale_d = core.descale.Debicubic(y, width, height, b=1, c=0).resize.Bicubic(1920, 1080, filter_param_a=1, filter_param_b=0)
descale_d = kgf.join([descale_d, u, v])
# Catmull-rom
descale_e = core.descale.Debicubic(y, width, height, b=0, c=1/2).resize.Bicubic(1920, 1080, filter_param_a=0, filter_param_b=1/2)
descale_e = kgf.join([descale_e, u, v])
# Spline36
descale_f = core.descale.Despline36(y, width, height).resize.Spline36(1920, 1080)
descale_f = kgf.join([descale_f, u, v])
You might realize that after descaling, we are immediately upscaling the frame with the same kernel and values again. This is done so we can compare the before and after. The closer the new frame is to the old one, the more likely it is that you’ve got the correct kernel. Zooming in on the frame at 4x magnification or higher using Nearest Neighbor will help immensely. An alternative that you can use is to simply descale until you’ve got what you believe to be the best result. It’s faster to do it this way, but might be less accurate.
Credits and other native 1080p elements
There is one very, very important thing to keep in mind when descaling:
Credits are usually done in 1080p.
There are various masks you can use
to help with dealing with that issue,
but it might be better
to make use of existing wrappers instead.
For this example I’ll
be using inverse_scale from kagefunc.
descaled = kgf.inverse_scale(src, height=878, kernel='bicubic', b=0, c=1/2, mask_detail=True)
We can make use of the mask
that inverse_scale uses internally
as well.
descaled = kgf.inverse_scale(src, height=874, kernel='bicubic', b=0, c=1/2)
descaled_mask = kgf._generate_descale_mask(vsutil.get_y(core.resize.Spline36(src, descaled.width, descaled.height)), vsutil.get_y(descaled), kernel='bicubic', b=0, c=1/2)
 Kaguya-sama: Love Is War — OP (credits mask)
 Kaguya-sama: Love Is War — OP (descaled)
Note that if you see the mask catching a lot of other stuff, you might want to consider not descaling that particular frame, or trying a different kernel/values. Chances are that you’re either using the wrong kernel or that the frames you’re looking at are native 1080p.
 Manaria Friends — 01 (end card)
 (Don’t descale this)
Dealing with bad descaling
There are various things you can do
to deal with scenes that have issues
even after descaling.
Eedi3 stands out in particular
as a fantastic AA filter
that really nails down bad lineart
caused by bad descaling.
It’s at best a “cheat code”,
however.
While it might fix up some issues,
it won’t fix everything.
It’s also incredibly slow,
so you might want to
use it on just a couple of frames at a time
rather than over the entire clip.
Other than Eedi3, usually the results of bad descaling are so destructive that there isn’t much you can do. If you have an encode that’s badly descaled, you’re better off finding a different one. If you’ve got bad results after descaling yourself, try a different kernel or values. Alternatively, try not descaling at all.
At the end of the day, as mentioned in the introduction, you can’t descale everything perfectly. Sometimes it’s better to think of it as a magical anti-ringing/haloing/aliasing filter rather than a scaler.
For example, here it was used specifically to fix up some bad aliasing in the source.
 Akanesasu Shoujo — 01 (src)
 Akanesasu Shoujo — 01 (rescaled)
scaled = kgf.inverse_scale(src, height=900, kernel='bicubic', b=0.25, c=0.45, mask_detail=True)
scaled = nnedi3_rpow2(scaled).resize.Spline36(1920, 1080)
Note how this fixed most of the aliasing on the CGI model.
Most, if not all, relevant VapourSynth scripts/plug-ins and their functions can be found in the VapourSynth Database.
Resampling
Resampling is a technique applied in various image processing tasks, most prominently scaling/resizing, but also shifting and rotation.
Resizing
The most common class of resampling algorithms used for resizing are the convolution-based resamplers. As the name suggests, these work by convolving the image with a filter function. These filter functions, also known as kernels, are what the terms Bilinear/Bicubic/Lanczos/etc. generally refer to. The ImageWorsener documentation features a great visual explanation of how this process works in detail. It is strongly recommended to read it. If you wish to explore the mathematics behind the design of these filters, the Sampling and Reconstruction chapter of Physically Based Rendering is one of the best places for a layman to start.
Filters
All resampling kernels behave slightly differently and generate artifacts of differing kinds and severity.
It should be noted that there is no “objectively best” resampling filter, so it is largely a matter of personal preference. There are no hard and fast rules about which resampler performs best for any given type of content, so it’s best to test them yourself.
A short overview of the most common filters follows. For a much more extensive explanation of the different filters, including details on the exact algorithms, see ImageMagick’s guide.
Additionally, ResampleHQ’s documentation features an excellent visual comparison of common filter kernels; a back-up is available here.
Box filter / Nearest Neighbour
When upscaling, the Box filter will behave just like Nearest Neighbour (NN) interpolation, that is, it will just pick the closest pixel in the input image for every output pixel. This results in the source pixel grid being magnified without any smoothing or merging of adjacent pixels, providing a faithful representation of the original pixel grid. This is very useful when inspecting an image up close to examine the pixel structure, or when enlarging pixel art, but not suitable for regular content due to the jagged lines and deformed details it causes.
When downscaling, the Box filter behaves differently to NN—which continues to just pick the closest pixel and be done with it—in that it instead merges adjacent pixels together. (This is because generally, filter kernels are widened in proportion to the scaling factor when downscaling, which, in effect, applies a low-pass filter that serves to prevent aliasing.) Unlike most other filters, however, it averages them evenly instead of giving the central ones more weight. (For example, reducing a 10 pixel row to 5 pixels will average every pixel pair.) This, again, can be a useful property in specific cases, but is not generally desirable.
The Box filter is available in VapourSynth
in the fmtconv plug-in:
clip = core.fmtc.resample(src, w, h, kernel="box")
Nearest Neighbour interpolation is part of the built-in resize plug-in:
clip = core.resize.Point(src, w, h)
Most script editors including VSEdit feature NN scaling in the preview; it is recommended to use it over Bilinear when making filtering decisions.
Bilinear / Triangle
Bilinear, also known as Triangle due to its graph’s shape, is one of the most common algorithms in widespread use because of its simplicity and speed. However, it generally creates all sorts of nasty artifacts and is inferior in quality to most other filters. The only advantage it offers is speed, so don’t use it unless you’re sure you have to.
VapourSynth example:
clip = core.resize.Bilinear(src, w, h)
Mitchell-Netravali / Bicubic
The Mitchell-Netravali filter, also known as Bicubic, is one of the most popular resampling algorithms, and the default for many image processing programs, because it is usually considered a good neutral default.
It takes two parameters, B and C, which can be used to tweak the filter’s behaviour. For upscaling, it is recommended to use values that satisfy the equation \(\mathrm{b} + 2\mathrm{c} = 1\).
The graph below outlines the various kinds of artifacts different B-C-configurations produce.
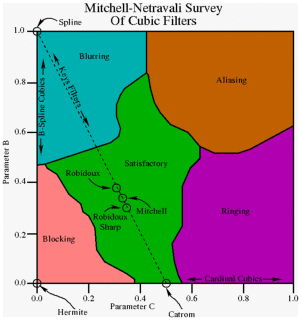 Bicubic B-C parameters
Roughly speaking, raising B will cause blurring and raising C will cause ringing.
Mitchell-Netravali generalizes all smoothly fitting (continuous first derivative) piece-wise cubic filters, so any of them can be expressed with the appropriate parameters. Below you can find a list of common cubic filters and their corresponding parameters in Mitchell-Netravali.
- B-Spline – b=1, c=0
- Hermite – b=0, c=0
- Mitchell-Netravali – b=1/3, c=1/3 (sometimes referred to as just “Mitchell”)
- Catmull-Rom – b=0, c=0.5
- Sharp Bicubic – b=0, c=1
Hermite is often considered one of the best choices for downscaling, as it produces only minimal artifacting, at the cost of slight blurriness.
VapourSynth example:
# 'filter_param_a' and 'filter_param_b' refer to B and C, respectively
clip = core.resize.Bicubic(src, w, h, filter_param_a=0, filter_param_b=0.5)
Lanczos
Lanczos is generally considered a very high-quality resampler for upscaling, especially its EWA version.
It is usually slightly sharper than Mitchell (Bicubic b=c=1/3), but might produce slightly more ringing.
Lanczos takes an additional parameter that controls the filter’s number of lobes, or taps. Increasing the number of lobes improves sharpness at the cost of increased ringing. You might occasionally see the tap count appended to the filter name to clarify the exact filter used, e.g. Lanczos2 for 2 taps.
For downscaling, higher tap counts might help in suppressing Moiré effects.
# 'filter_param_a' specifies the tap count
clip = core.resize.Lanczos(src, w, h, filter_param_a=2)
Spline
Spline is another high-quality resizer.
Spline, like Lanczos, can be fine-tuned by configuring its number of lobes. Unlike Lanczos, however, Splines with different tap counts are usually split into separate functions, with \((\mathrm{tap~count} \times 2)^2\) appended to their name, e.g. Spline36 for 3 taps, Spline64 for 4, etc. (This number represents the total amount of input pixels involved in the calculation of any given output pixel.)
Spline36 is a very popular choice for downscaling, since it is fairly artifact-free yet decently sharp. For upscaling, it looks similar to Lanczos3, though arguably slightly less artifacted.
VS example:
clip = core.resize.Spline36(src, w, h)
Higher tap counts can be used via fmtconv:
clip = core.fmtc.resample(src, w, h, kernel="spline", taps=6) # equivalent to Spline144
Gauss
The Gaussian filter is very special in that its Fourier transform1 is another Gaussian whose width is inversely proportional to the spatial function’s. This can be harnessed to remove and amplify high frequencies in a very controllable way. Widening the filter, for example, will confine the output to small frequencies (blurrier), whereas squashing it will amplify higher frequencies (more aliasing).
In practice, though, the Gaussian filter isn’t all too useful for regular resizing. However, it can be used to accurately emulate a Gaussian blur (when used without resizing) in VapourSynth.
For example:
blurred = core.fmtc.resample(src, kernel="gauss", fh=-1, fv=-1, a1=1)
fh=-1, fv=-1 forces the processing
when no resizing is performed.
a1 controls the blurring:
the higher,
the sharper the image.
Interpolation filters
Some sources will categorize filters as either interpolation filters or non-interpolation filters.
Interpolation filters are those that when applied “in-place”, i.e. at the location of the input samples, don’t alter the sample value. Therefore, they only interpolate “missing” values, leaving the input samples untouched.
This is true for filters that evaluate to 0 at all integer positions except 0 or whose support is <= 1. Examples include: (Windowed) Sinc filters, such as Lanczos, Bicubic with B=0, e.g. Hermite and Catmull-Rom, and Triangle/Bilinear.
This can be a beneficial property in some cases, for example the No-Op case. No-Op means that no scaling, shifting or similar is performed, that is, the input is resampled at exactly the same positions. In this case, an interpolation filter will return the input image untouched, whereas other filters will slightly alter it.
Another, more practical, case where this property is useful is when shifting an image by full pixel widths (integers), again because input pixel values aren’t changed but just relocated.
Two-dimensional resampling
There are two different ways to go about resampling in two dimensions.
Tensor resampling (orthogonal, 2-pass, separated)
The image is resampled in two separate passes: First it is resampled horizontally, then vertically. This allows images to be treated 1-dimensionally since each pixel row/column can be resampled separately. The main advantage of this method is that it’s extremely fast, which is why it’s the much more common one; generally, unless indicated otherwise, this is what is used.
Elliptical Weighted Averaging (“EWA”, cylindrical, polar, circular)
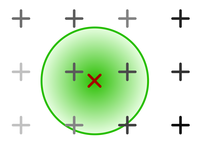 Two-dimensional kernel. The radius is colored green.
All input samples whose Euclidean distance to the pixel is within the filter’s radius contribute to its value. The Euclidean distance is passed to the filter kernel. This is a lot more costly than tensor resampling in terms of runtime.
Scaling in modified colorspaces
The colorspace used when resampling can significantly impact the output’s subjective quality.
Downscaling in linear light
Downscaling in gamma-corrected light instead of linear light can sometimes noticeably dim the image. To see why this happens, consider this gradient:
 A grayscale gradient from 0 to 255.
It should be apparent that the brightness doesn’t scale linearly with the pixel values. This is because most digital video uses gamma-transformed pixel values in order to compress more perceptually distinct color shades into 8 bit. This causes the encoded pixel values to deviate from their expected brightness, e.g. a grey pixel has value 187 instead of 127 in sRGB. This poses a problem when merging and interpolating colors, because the average pixel value of two colors no longer corresponds to their average perceived brightness. For example, if you wanted to merge black and white (0 and 255), you would expect to get grey, but since grey actually has a value of ~187, the output pixel would turn out substantially darker, if you were you to naively average the pixel values.
To calculate the correct values, the gamma transform needs to be reversed before scaling and re-applied afterwards.
The dimming effect of scaling in gamma-corrected light is usually only noticeable in dense color patterns, e.g. small black text on a white background, stars in the night sky, etc, and much less so in blurrier areas.
See this comparison for a particularly extreme example of linear vs gamma downscaling.
However, this doesn’t necessarily mean downscaling in linear light is always the right choice, since it noticeably accentuates dark halos introduced by scaling. Thus, it may be wise to scale in gamma light when using a resizer prone to overshooting, like high-lobe Lanczos. Besides, the dimming may even be desirable in some cases like black text on white paper, because it preserves legibility.
If you choose to downscale in linear light, make sure to use a sufficiently high bitdepth so as to not introduce banding.
Example code for resizing in linear RGB light:
linear = core.resize.Bicubic(src, format=vs.RGBS, transfer_in_s="709", transfer_s="linear", matrix_in_s="709")
scaled_linear = core.resize.Bicubic(linear, 640, 360)
scaled_gamma = core.resize.Bicubic(scaled_linear, format=src.format, transfer_s="709", transfer_in_s="linear", matrix_s="709")
Note that the matrix_s and matrix_in_s arguments
are only necessary when src is YUV;
otherwise, they should be omitted.
Upscaling in sigmoidized light
In order to attenuate both dark and white halos introduced by upscaling, you can resize through a sigmoidized colorspace.
This means converting the linear RGB version of an image to a custom colorspace with an S-shaped intensity curve before scaling and converting it back afterwards. What this does, essentially, is decrease the image’s contrast by pushing extreme values of both dark and bright towards the middle.
Quoting Nicholas Robidoux from ImageMagick2:
You may decrease halos and increase perceptual sharpness by increasing the sigmoidal contrast (up to 11.5, say). Higher contrasts are especially recommended with greyscale images (even “false RGB greyscale” that have three proportional color channels). The downside of sigmoidization is that it sometimes produces “color bleed” artefacts that look a bit like cheap flexographic (“gummidruck”) printing or chromatic aberration. In addition, sigmoidization’s “fattening” of extreme light and dark values may not work for your image content. If such artefacts are obvious, push the contrast value down from 7.5 (to 5, for example, or even lower). Setting the contrast to 0 is equivalent to enlarging through linear RGB. (Robidoux, 2012)
Example code for VS:
import havsfunc as hf
linear = core.resize.Bicubic(src, format=vs.RGBS, transfer_in_s="709", transfer_s="linear", matrix_in_s="709")
sigmoidized = hf.SigmoidInverse(linear, thr=0.5, cont=6.5) # 'cont' corresponds to the "sigmoidal contrast" mentioned above
scaled_sigmoid = core.resize.Bicubic(sigmoidized, 640, 360)
de_sigmoidized = hf.SigmoidDirect(scaled_sigmoid, thr=0.5, cont=6.5)
scaled_gamma = core.resize.Bicubic(de_sigmoidized, format=src.format, transfer_s="709", transfer_in_s="linear", matrix_s="709")
Neural network scalers
NN-based scalers have become increasingly popular in recent times. This is because they aren’t subject to the technical limitations of convolution-based resamplers—which beyond a certain point only trade one artifact for another—and thus produce much higher quality upscales.
NNEDI3
This is the current de-facto standard for high-quality upscaling because it generally produces equally as sharp or sharper images than conventional scalers, while avoiding any major artifacting such as haloing, ringing or aliasing.
Nnedi3 was originally conceived as a deinterlacer; as such, it only doubles a frame’s height, leaving the original pixel rows untouched and interpolating the missing ones. This, however, can trivially be leveraged to increase image dimensions by powers of two (by doubling n times, flipping the image, doubling n times again, and flipping back).
Upsampling to arbitrary dimensions can be achieved by scaling by the smallest power of two that results in a bigger image than desired, and downscaling to the requested resolution with a conventional scaler (the most popular choice for this is Spline36).
However, you should note that good quality comes at a cost: nnedi3 will generally be several orders of magnitude slower than conventional resamplers.
VapourSynth usage example:
from nnedi3_rpow2 import *
# 'spline36' here is technically redundant since it's the default
up = nnedi3_rpow2(src, width=1920, height=1080, kernel="spline36")
Shifting
Shifting an image by an arbitrary amount, including non-integer values, requires resampling as well. For example, left-shifting by a quarter pixel will resample the image at the input samples’ positions minus 0.25.3 This also means that, unless a interpolative filter is used, even shifting by integer amounts will alter the image.
Side note: It can be interesting to think of shifting not as resampling at shifted pixel locations, but as resampling at the input locations with a shifted kernel.
Chroma shifting
When going from 4:2:0 subsampling to 4:4:4 (no subsampling), it is important to take into account chroma placement and to shift the chroma accordingly to ensure it aligns with the luma.
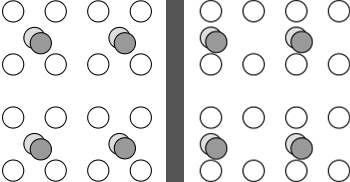 YUV 4:2:0 subsampling with center-aligned chroma (left) and, as per MPEG-2, left-aligned chroma (right).
There are two commonly used chroma siting patterns, as illustrated by the graphic above. Most digital video today uses the MPEG-2 variant, that is, left-aligned chroma. This is essential to keep in mind when going from 4:2:0 to 4:4:4, because if the chroma planes are naively upscaled and joined with the luma plane without any shifting, the chroma will be shifted by a quarter pixel. This is a consequence of the way output pixels are usually mapped onto the input grid during resampling:
 Pixel mapping in common resampling algorithms (2 -> 4 upscale).
Essentially, the output grid is scaled such that the outer edges of the pixel boxes align, importantly under the assumption that samples are center-aligned within the pixel boxes. Therefore, when scaling a chroma plane by 200%, which is what happens to the chroma when going from 4:2:0 to 4:4:4, the new chroma sample positions will match up with the luma sample positions. This would be the correct mapping if the resamplers’s assumption of center-alignment was true—if it isn’t (like with MPEG-2 chroma placement) we have to compensate for the offset by shifting the input samples by a quarter pixel width to the left before calculating the output samples. This way, the left-alignment is restored.
Similarly,
when resizing left-aligned 4:2:0 material
while keeping the subsampling,
a slight shift needs to be applied
to preserve the alignment.
Specifically,
the chroma needs to be shifted by
\(0.25 - 0.25 \times \frac{\mathrm{srcwidth}}{\mathrm{dstwidth}}\).4
Chroma shifting is performed automatically under the hood by most format conversion software (including zimg, VapourSynth’s resizing library) and media players. Thus, we only need to take care of it if we handle the chroma upscaling separately by hand.
In VS,
shifting can be performed with the resize functions’ src_left parameter:
u = core.std.ShufflePlanes(src, planes=1, colorfamily=vs.GRAY)
shifted_scaled_u = core.resize.Spline16(u, 1920, 1080, src_left=0.25) # shifts the image to the left by 0.25 pixels
The Fourier transform is an ubiquitous concept in image processing, so we strongly advise becoming familiar with at least the basics. A very good resource for this topic is ImageMagick’s guide.
Robidoux, N. (2012, October 21). Resampling — ImageMagick v6 Examples. Retrieved August 22, 2019, from https://www.imagemagick.org/Usage/filter/nicolas/#upsampling
If you don’t understand what this means, read the resources linked above in the resizing section.
This is derived as follows: The shift is the distance between the position of the first luma sample and the position of the first chroma sample (both mapped onto the input grid and given in terms of input chroma pixel widths). The former is located at \(0.25 + \frac{\mathrm{srcwidth}}{4 \times \mathrm{dstwidth}}\), the latter at \(\frac{\mathrm{srcwidth}}{2 \times \mathrm{dstwidth}}\). This yields \(0.25 + \frac{\mathrm{srcwidth}}{4 \times \mathrm{dstwidth}} - \frac{\mathrm{srcwidth}}{2 \times \mathrm{dstwidth}} = 0.25 + \frac{\mathrm{srcwidth}}{\mathrm{dstwidth}} \times \left( ^1/_4 -,^1/_2 \right) = 0.25 + \frac{\mathrm{srcwidth}}{\mathrm{dstwidth}} \times (-0.25)\) for the shift.
Encoding with x264
H.264 has been the de facto standard video format across the internet for the past decade. It is widely supported for playback in all modern browsers and many hardware devices such as gaming consoles and phones. It provides better video quality at smaller file sizes compared to its predecessors.
x264 is a mature, free, open-source encoder for the H.264 video format.
Prerequisites
To get started, you’ll need two things:
- A video to encode. For the examples, we will pipe in a video from VapourSynth, which you should be able to do if you’ve been following the previous sections of this guide.
- The x264 encoder.
Here’s how we get a copy of the x264 encoder:
Windows
Official Windows builds are available here.
Linux/macOS
Generally, x264 will be available through your distribution’s package manager. Here are a few examples:
- Ubuntu/Debian:
sudo apt install x264 - Arch Linux:
sudo pacman -S x264 - macOS:
brew install x264
Getting Started
x264 is very configurable, and the options may seem overwhelming. But you can get started encoding by using the presets x264 provides and understanding a few basic concepts. We’ll walk through those concepts with the following examples.
Example 1: General-Purpose Encoding
Open up a terminal window, and navigate to the folder where your VapourSynth script lives. Let’s run the following command:
vspipe --y4m myvideo.vpy - | x264 --demuxer y4m --preset veryfast --tune animation --crf 24 -o x264output.mkv -
Let’s run through what each of these options means:
vspipe --y4m myvideo.vpy -
This portion loads your VapourSynth script
and pipes it to stdout,
adding y4m headers that x264 can decode.
If you use Linux,
you’re probably familiar with how piping works.
If you’re not,
it’s basically a way of chaining two commands together.
In this case, we want to chain vspipe,
the program that reads VapourSynth scripts,
with x264, our encoder.
--demuxer y4m
This tells x264 that we’re providing it with a y4m file.
This matches up with the --y4m flag
that we gave to the vspipe command.
--preset veryfast
x264 has a set of presets to switch between faster encoding, or higher quality. The full list of presets, from fastest to slowest, is:
- ultrafast
- superfast
- veryfast
- faster
- fast
- medium
- slow
- slower
- veryslow
- placebo
You will almost never want to use the extreme settings,
but generally, if you want good quality
and don’t care about how long the encode takes,
slower or veryslow are recommended.
In this example,
because we are just demonstrating how x264 works,
we want a fast encode and have chosen veryfast.
For the curious,
you can see a full list of the settings enabled by each preset
by running x264 --fullhelp | less (Linux/Mac)
or x264 --fullhelp | more (Windows).
However, this probably won’t mean much at the moment.
Don’t worry,
this page will explain later
what all of those settings mean.
Disclaimer:
x264’s fullhelp is not guaranteed to be up-to-date.
--tune animation
Beyond the preset chosen, x264 allows us to further tune the encoding settings for the type of content we’re working with. The following tunings are generally the most useful:
film: Recommended for live action videos.animation: Recommended for anime or cartoons with flat textures. For 3D animation (e.g. Pixar movies), you may find better results withfilm.grain: Recommended for particularly grainy films.
You don’t need to use a tuning, but it generally helps to produce a better-looking video.
--crf 24
Constant Rate Factor (CRF) is a constant-quality, 1-pass encoding mode. In layman’s terms, this means that we don’t need the output to meet a specific filesize, we just want the output to meet a certain quality level. CRF ranges from 0 to 51 (for 8-bit encoding), with 0 being the best quality and 51 being the smallest filesize, but there is a certain range of CRF settings that are generally most useful. Here are some guidelines:
- CRF 13: This is considered visually lossless to videophiles. This can produce rather large files, but is a good choice if you want high quality videos. Some fansubbing groups use this for Blu-ray encodes.
- CRF 16-18: This is considered visually lossless to most viewers, and leans toward high quality while still providing a reasonable filesize. This is a typical range for fansub encodes.
- CRF 21-24: This provides a good balance between quality and filesize. Some quality loss becomes visible, but this is generally a good choice where filesize becomes a concern, such as for videos viewed over the internet.
- CRF 26-30: This prioritizes filesize, and quality loss becomes more obvious. It is generally not recommended to go higher than CRF 30 in any real-world encoding scenario, unless you want your videos to look like they were made for dial-up.
-o x264output.mkv -
This last portion tells which files to use for the input and output.
We use -o to tell which filename to write the encoded file to.
In this case, x264 will write a file at x264output.mkv
in the current directory.
The last argument we are passing to x264 is the input file.
In this case, we pass - for the input file,
which tells x264 to use the piped output from vspipe.
The input argument is the only positional argument,
so it does not need to be last;
x264 will recognize it
as the only argument without a -- flag before it.
Example 2: Targeted File Size
For the next example, let’s say we want to make sure our encode fits onto a single 4.7GB DVD1. How would we do that in x264?
First, we’ll need to figure out what bitrate our encode should be, in kilobits per second. This means we’ll need to know a couple of things:
- The length of our video, in seconds. For this example, let’s say our movie is 2 hours (120 minutes) long. We’ll convert that to seconds: 120 minutes * 60 minutes/second = 7200 seconds.
- Our target filesize. We know that this is 4.7GB, but we need to convert it to kilobits. We can do this with the following steps:
$$ \begin{aligned} 4.7~\mathrm{GB}\times \frac{1000~\mathrm{MB}}{\mathrm{GB}} &= 4700~\mathrm{MB}\\ 4700~\mathrm{MB}\times \frac{1000~\mathrm{KB}}{\mathrm{MB}} &= 4,700,000~\mathrm{KB}\\ 4,700,000~\mathrm{KB}\times \frac{8~\mathrm{Kbit}}{\mathrm{KB}} &= 37,600,000~\mathrm{Kbit} \end{aligned} $$
Now we divide the kilobit size we calculated by our video length, to find our kilobit per second target bitrate:
$$ 37,600,000~\mathrm{Kbit}\div 7200~\mathrm{seconds} \approx 5222~\mathrm{Kbps} $$
There is also a python script that can handle this calculation for us:
>>> from bitrate_filesize import *
>>> find_bitrate('4.7 GB', seconds=7200)
bitrate should be 5,222 kbps
And here’s how we could add that to our x264 command:
vspipe --y4m myvideo.vpy - | x264 --demuxer y4m --preset veryfast --bitrate 5222 -o x264output.mkv -
The --bitrate option, by itself,
says that we want to do a 1-pass, average-bitrate encode.
In other words, the encoder will still give more bits
to sections of the video that have more detail or motion,
but the average bitrate of the video
will be close to what we requested.
Example 3: 2-Pass Encoding
So far, we’ve only done 1-pass encodes. While using CRF 1-pass is great when you don’t have a target bitrate, it’s recommended not to use 1-pass for targeted-bitrate encodes, because the encoder can’t know what’s coming ahead of the current section of video. This means it can’t make good decisions about what parts of the video need the most bitrate.
How do we fix this? x264 supports what is known as 2-pass encoding. In 2-pass mode, x264 runs through the video twice, the first time analyzing it to determine where to place keyframes and which sections of video need the most bitrate, and the second time performing the actual encode. 2-pass mode is highly recommended if you need to target a certain bitrate.
Here’s how we would run our first pass:
vspipe --y4m myvideo.vpy - | x264 --demuxer y4m --preset veryfast --pass 1 --bitrate 5222 -o x264output.mkv -
This creates a stats file in our current directory, which x264 will use in the second pass:
vspipe --y4m myvideo.vpy - | x264 --demuxer y4m --preset veryfast --pass 2 --bitrate 5222 -o x264output.mkv -
You’ll notice all we had to change was --pass 1 to --pass 2. Simple!
Although x264 will automatically use faster settings for the first pass, it should be no surprise that 2-pass encoding is slower than 1-pass encoding. Therefore, there are still certain use cases where 1-pass, bitrate-targeted video is a good fit, such as streaming.
Recap
We covered the basics of how to encode in x264, including speed presets, tunings, and three different encoding modes.
Here is a summary of when to use each encoding mode:
- 1-pass Constant Quality (CRF):
- Good for: General-purpose encoding
- Bad for: Streaming; obtaining a certain file size
- 1-pass Average Bitrate:
- Good for: Streaming
- Bad for: Everything else
- 2-pass Average Bitrate:
- Good for: Obtaining a certain file size
- Bad for: Streaming
Advanced Configuration
Coming Soon
Encoding with x265
High Efficiency Video Coding (HEVC), also known as H.265 and MPEG-H Part 2, is a video compression standard designed as part of the MPEG-H project as a successor to the widely used Advanced Video Coding (AVC, H.264, or MPEG-4 Part 10). Comparing with H.264, HEVC offers up to 50% better data compression at the same level of video quality, or substantially improved video quality at the same bit rate. By 2017, most high-end smartphones and many mid-range devices had HEVC decoding capabilities built in, making it easier to play HEVC videos on a variety of devices.
x265 is an open-source software (codec) for encoding video in HEVC. Because of its better 10-bit color depth support, support for multiple HDR formats, and higher data compression rate compared to x264, x265 has become the mainstream encoding tool for fansubbers.
Prerequisites
To get started, you’ll need two things:
- A video to encode.
For the examples, we will pipe in a video from VapourSynth, which you should be able to do if you’ve been following the previous sections of this guide. - The x265 encoder.
It’s worth mentioning that there are several modified versions of x265 specifically improved for animation encoding.
These modifications may include some custom features and performance optimizations. They might also include several tune presets.
Since there is no official build of x265, it is highly recommended to download HandBrake, which is an open-source video transcoder with several built-in codecs and an easy-to-use user interface.
If you want to build your own standalone x265, check the official git repository, all build scripts are provided. For those modified versions, please check their own sites.
Getting Started
The following contents assume
you already have a standalone build of x265,
and already added it into your system PATH.
Like x264, x265 is also very configurable and the options may seem overwhelming, too, but you can get started encoding by using the presets x265 provides and understanding a few basic concepts. Check the x265 CLI documentation for the full list of CLI options.
We’ll walk through those concepts with the following examples.
Example 1: General-Purpose Encoding
Open up a terminal window, and navigate to the folder where your VapourSynth script lives. Let’s use the following command:
vspipe -c y4m myvideo.vpy - | x265 --y4m --profile main10 --preset veryfast --tune animation --crf 20 -o x265output.mkv -
We’ll run through what each of these options means:
vspipe -c y4m myvideo.vpy -
This portion loads your VapourSynth script
and pipes it to stdout,
adding y4m headers that x265 can decode.
If you use Linux,
you’re probably familiar with how piping works.
If you’re not,
it’s basically a way of chaining two commands together.
In this case, we want to chain vspipe,
the program that reads VapourSynth scripts,
with x265, our encoder.
--y4m
This tells x265 that we’re providing it
with a y4m (YUV4MPEG2) file.
This matches up with the --y4m flag
that we gave to the vspipe command.
--profile main10
Enforce the requirements of the specified profile, ensuring the output stream will be decodable by a decoder which supports that profile.
The following profiles are supported in x265 at the time of writing (2023-02-12).
8-bit profiles:
main,main-intra,mainstillpicture(ormspfor short)main444-8,main444-intra,main444-stillpicture
10-bit profiles:
main10,main10-intramain422-10,main422-10-intramain444-10,main444-10-intra
12-bit profiles:
main12,main12-intramain422-12,main422-12-intramain444-12,main444-12-intra
“Intra” means “intra-frame coding”, which is a data compression technique that predicts the values of a particular frame based on the values of the same frame.
--preset veryfast
x265 has a set of presets to switch between faster encoding or higher quality. The full list of presets, from fastest to slowest, is:
- ultrafast
- superfast
- veryfast
- faster
- fast
- medium (default)
- slow
- slower
- veryslow
- placebo
Different presets determine different parameters. Check the official doc for detailed information.
You will almost never want to use the extreme settings,
but generally,
if you want good quality
and don’t care about how long the encode takes,
slower or veryslow are recommended.
In this example,
because we are just demonstrating how x265 works,
we want a fast encode
and have chosen veryfast.
--tune animation
Beyond the preset chosen, x265 allows us to further tune the encoding settings for the type of content we’re working with. The following tunings are generally the most useful:
film: Recommended for live action videos.animation: Recommended for anime or cartoons with flat textures. For 3D animation (e.g. Pixar movies), you may find better results withfilm.
You don’t need to use a tuning, but it generally helps to produce a better-looking video.
--crf 20
Constant Rate Factor (CRF) is a constant-quality, 1-pass encoding mode.
In layman’s terms,
this means that we don’t need the output to meet a specific file size,
we just want the output to meet a certain quality level.
CRF ranges from 0 to 51,
with 0 being the best quality (lossless)
and 51 being the smallest file size,
but there is a certain range of CRF settings
that are generally most useful.
For high quality anime encoding,
at least 18.0 is recommended.
-o x265output.mkv -
This last portion tells which files to use for the input and output.
We use -o to tell which filename
to write the encoded file to.
In this case,
x265 will write a file at x265output.mkv
in the current directory.
The last argument we are passing to x265 is the input file.
In this case,
we pass - for the input file,
which tells x265 to use the piped output from vspipe.
The input argument is the only positional argument,
so it does not need to be last;
x265 will recognize it
as the only argument without a - marker before it.
Example 2: Targeted File Size
For the next example, let’s say we want to make sure our encode fits onto a single 4.7GB DVD1. How would we do that in x265?
First, we’ll need to figure out what bitrate our encode should be, in kilobits per second. Everything you need to know is listed in the x264 documentation.
And here’s how we could add that to our x265 command:
vspipe -c y4m myvideo.vpy - | x265 --y4m --preset veryfast --bitrate 5222 -o x265output.mkv -
The --bitrate option, by itself,
says that we want to do a 1-pass, average-bitrate encode.
In other words,
the encoder will still give more bits to sections of the video
that have more detail or motion
but the average bitrate of the video will be close to what we requested.
Example 3: 2-Pass Encoding
So far, we’ve only done 1-pass encodes. While using CRF 1-pass is great when you don’t have a target bitrate, it’s recommended not to use 1-pass for targeted-bitrate encodes, because the encoder can’t know what’s coming ahead of the current section of video. This means it can’t make good decisions about what parts of the video need the most bitrate.
How do we fix this? x265 supports what is known as 2-pass encoding. In 2-pass mode, x265 runs through the video twice, the first time analyzing it to determine where to place keyframes and which sections of video need the most bitrate, and the second time performing the actual encode. 2-pass mode is highly recommended if you need to target a certain bitrate.
Here’s how we would run our first pass:
vspipe -c y4m myvideo.vpy - | x265 --y4m --preset veryfast --pass 1 --bitrate 5222 -o x265output.mkv -
This creates a stats file in our current directory, which x265 will use in the second pass:
vspipe -c y4m myvideo.vpy - | x265 --y4m --preset veryfast --pass 2 --bitrate 5222 -o x265output.mkv -
You’ll notice all we had to change was --pass 1 to --pass 2.
Simple!
Although x265 will automatically use faster settings for the first pass, it should be no surprise that 2-pass encoding is slower than 1-pass encoding. Therefore, there are still certain use cases where 1-pass, bitrate-targeted video is a good fit, such as streaming.
Recap
We covered the basics of how to encode in x265, including speed presets, tunings, and three different encoding modes.
Here is a summary of when to use each encoding mode:
- 1-pass Constant Quality (CRF):
- Good for: General-purpose encoding
- Bad for: Streaming; obtaining a certain file size
- 1-pass Average Bitrate:
- Good for: Streaming
- Bad for: Everything else
- 2-pass Average Bitrate:
- Good for: Obtaining a certain file size
- Bad for: Streaming
Advanced Configuration
Coming Soon.
Aegisub & Other Tools
Tools
The first thing you’ll need to do is make sure your tools are in order. Typesetters will need more tools than most other roles in fansubbing and they need to be configured properly.
Here is a list of tools you will want to download:
- Aegisub
- It is highly recommended to use arch1t3cht’s fork, which includes Dependency Control, several critical fixes , several new features, and is in general the most actively maintained fork.
- If you are, for some reason, interested in the history of Aegisub and the recent-ish forks, you can read about it in a somewhat up-to-date article on some Fansubbing Wiki.
- A font manager
- Not all font managers are equal. Choose the one that works the
best for you. Some important features might include:
- Performance with large font libraries.
- Add fonts from folders, not just installed fonts.
- Activate fonts for use without installing.
- Organize fonts in a meaningful way.
- Works on your OS.
- Free Options
- Paid (Note: can be found free on certain websites)
- Not all font managers are equal. Choose the one that works the
best for you. Some important features might include:
- Software for motion-tracking
- x264 binary
- Download the latest binary for your platform. (
x264-r3015-4c2aafdat the time of this edit.)
- Download the latest binary for your platform. (
- Adobe Photoshop and Illustrator
Configuring Aegisub
NOTE: the following assumes you have installed the recommended build mentioned above.
For now, just change your settings to reflect the following. If you’ve made any changes previously for another fansub role, be careful not to overwrite those. When in doubt, ask someone with Aegisub experience. Settings can be accessed via View > Options or with the hotkey Alt + O.
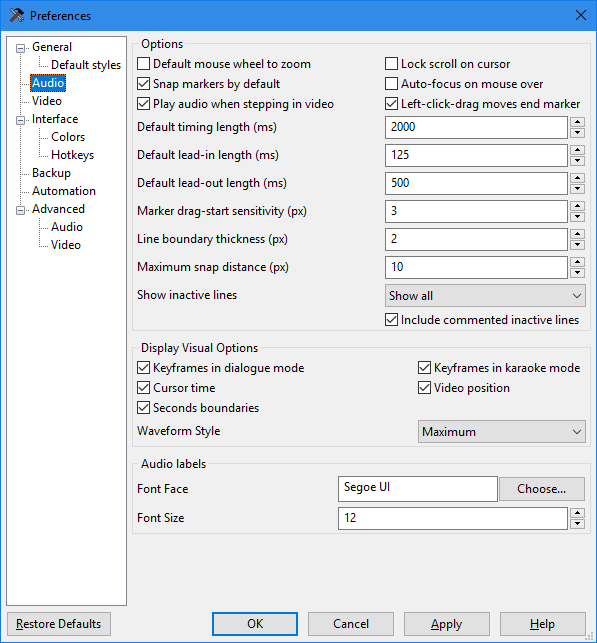
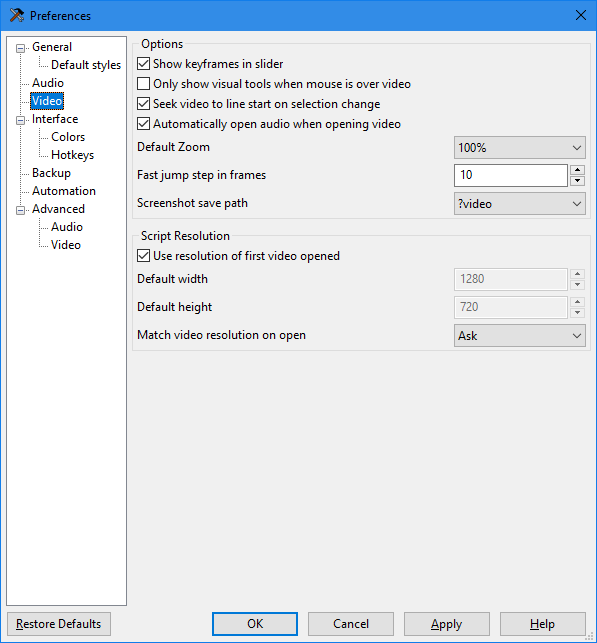
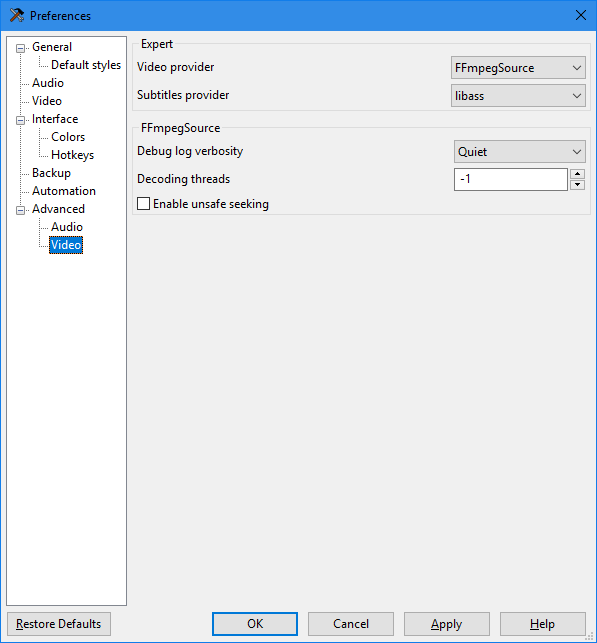 Aegisub 8975-master-8d77da3 preferences
Under File > Properties, there is an additional option for the YCbCr Matrix of the script. This option will set the color space of the script, and you will most likely be working with TV.709, or BT.709. If you are subtitling with a video present (using Video > Open Video…), this option as well as the script resolution will automatically be set to match the video source.
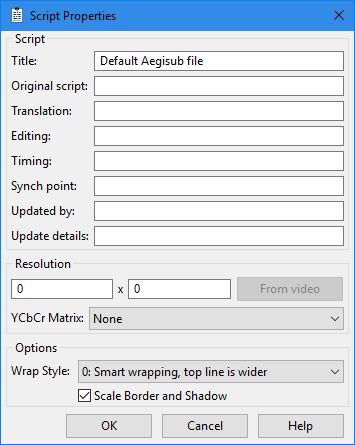 Aegisub 8975-master-8d77da3 script properties
For most cases with modern fansubbing, the BT.709 color space will be used as opposed to the legacy BT.601 color space. If you want a more in-depth explanation of color matrices and how these two are different, visit Maxime Lebled’s blog, but the gist of it is this: BT.601 is for Standard Definition video and BT.709 is for High Definition video1.
Manually setting the script to BT.601 could irreversibly ruin the colors of any typesetting, dialogue, or kfx already in the script. Even worse, some video renderers will read this setting from the muxed subtitles and render the video to match it.
If you are working on a DVD or something in Standard Definition, you can change this to BT.601 manually in File > Script Properties. However, not all Standard Definition video will be BT.601, so when in doubt, ask the encoder or check the source’s MediaInfo if they are not available.
The “Subtitles Provider”
The recommended build of Aegisub comes pre-equipped with libass, so no manual settings change is needed. The following is a brief history of subtitle renderers.
Just a few years ago, there was a pretty clear consensus on which subtitle renderer to use for anime and softsubs. These days, not so much. It used to be that VSFilter was the only supported renderer by most fansub groups. VSFilter, being the first of its kind, is considered the original subtitle renderer. However, it was eventually replaced with xy-VSFilter, and then later replaced with xySubFilter because VSFilter and xy-vsfilter were not performing as well with the resource requirements of newer subtitles. However, VSFilter, and its derivatives xy-vsfilter and xySubFilter, only support Windows operating systems. They have often been used in codec packs2 for players we don’t recommend, such as MPC-HC.
By 2015, however, xySubFilter development had come to a halt and since then, libass has made many improvements both in speed and compatibility with advanced subtitling in part due to contributions from members of the fansub community. At the end of the day, which renderer you choose is up to you, but we recommend libass. It is maintained, cross-platform, able to handle most typesetting, and has been integrated into many commercial and open-source software products. Libass is used in the cross-platform player mpv, that we recommend for all anime-viewing purposes.
Hotkeys
As you develop your skills more and begin to integrate automation scripts into your workflow, you will probably want to consider adding hotkeys to cut down on time navigating menus. These can be accessed via Interface > Hotkeys in Aegisub’s Options menu. We’ll let you decide on those yourself, however, and move on for now.
For further reading on this, visit the Wikipedia pages for Standard Definition video, High Definition video, and the BT.601 and BT.709 color spaces.
With the development of mpv, codec packs and player add-ons are no longer required.
Masking using PS and AI
Preface
Most of the Masking With Adobe Photoshop (PS) & Adobe Illustrator (AI) guide is written by gsk_. If you see any pronouns such as “I”, “me”, “my”, etc., unless otherwise stated, it refers to me.
Before we get to know on how to work with AI, I would like to give a small warning. AI is a really advanced, powerful tool for typesetting and if you use it carelessly it may cause Exploooooooooooosion.gif since its results are heavy to render and take a toll on toasters. This is something to always keep in mind, so make sure you use it in moderation and try to avoid whenever you can.
My aim of writing this guide is to show basics of Photoshop, Illustrator and their relevant parts/features and give you some direction on to how to use them. Throughout the guide, I will be abbrevating Photoshop as PS and Adobe Illustrator as AI.
I assume you have all the software installed and ready to go And I also assume you know the basics of Aegisub, so I will be skipping detailed explanation of it. If you don’t, I implore you to read the infamous unanimated guide.
Tools required
Image Processing in PS
Procedure
Before we start, note that we will be doing all the grunt work in PS while keeping AI usage to bare minimum. If you are familiar with editing in PS, you can skip this part and proceed to Image Tracing in AI. If not, continue reading this guide where I will show few essential tools to get you to speed but for in depth editing and all the tools in PS, refer tutorials online.
So on one fine day I was doing Fruits Basket Final Ep.06 and suddenly I came across this abomination, so I, the typesetting warrior who has taken a vow to eliminate all Japanese in video, decided to mask this.
 Raw Image
If you look at the image carefully you will notice that there is a gradient radially and also some sort of grain. Masking this in Aegisub is a challenging and quite difficult, so if you come across such masks you can opt this method.
Open the image in PS (drag and drop it). It will look something like this.
 Photoshop window
Before we start our magic, we need to remove the unnecessary part, otherwise your script will be 100 MB. Select the Rectangular Marquee tool1 which is the second icon on the left side panel.
 Rectangular Marquee tool
Draw a rectangle of what you want to mask, right click on the region, and select Select Inverse. I drew something like this.
 Select the area and inverse the selection
After that, select Eraser tool which is 12th icon from the top.
 Eraser tool
By holding the button you will get even more options. Now, select the Erase Tool.
 Extra Eraser options
After selecting, press the right mouse button on the image. You should see a pop up where you increase the Size parameter to the maximum.
 Eraser size
Now select the Eraser tool again, but this time use the Background Eraser and do the same thing as above.
 Background Eraser
If you haven’t messed up you should be seeing something like this.
 Clean BG image
Now we can start masking. Select the Rectangular Marquee tool around letter O and select Edit->Content-Aware Fill.2
 Fill
Fill
You should see a pop-up like below and click on OK.
 Fill options
Afterwards, you should see a good mask. If the mask is not to your linking, redo the previous step and mess with the Sampling Area Options until you are satisfied with the result.
 Masking
There is something to keep in mind: This will create a new layer by default but you can change that option. Regardless, make sure you are working on the correct layer.
Follow the above steps until you yeeted all the Japanese.
Once you are satisfied, save this file as .png.
This was my final result, which looks pretty good.
 Final Image
That is all for PS part. Now we can continue with AI.
There are various another tools such as Lasso Tool, Polygonal Lasso Tool .etc to draw free hand areas.
You can hotkey this.
Image Tracing in AI
Procedure
I assume you have installed AI2ASS. If not, do it now.
Drag and drop the final mask image which you have created in PS into AI. Make sure you have selected Essentials Classic as your work space.
 Work space
Now click on Image Trace which can be found in the bottom of the right panel. After selecting, you will see a number of options in which you select High Fidilety Photo.1 There is some pre-processing that needs to be done, so wait for it to be completed. After that you should see a window like below. Click on Expand at the bottom of right panel.
 Expand
After Expansion you should see blue lines on image like pictured below. Now click on Ungroup, again at the bottom of right panel.
 Ungroup
Deselect the whole thing by clicking anywhere outside the canvas and press Ctrl+Shift+D.2 Afterwards, click on the white background and press Delete. If you didn’t messed up, you should see a clean image.
 Clean AI image
Sometimes ImageTrace can create white spots around the edges, so it is better to do a sanity check and make sure that there are no white spots around the edges.
Click on Document Setup in the bottom right. In the pop-up window. select Grid Colors option to Custom and choose a color that is in contrast with the image. I generally use green but you may use whatever color is convenient for you. Confirm your choice by clicking on OK.
 Grid colours
Press Z to Zoom and press V to activate the Selection tool. Click on any white spots and press Delete to delete them. This is what you should see at the end.
 Final image
Sometimes there might be holes in the drawings. Generally you can ignore those since they are only visible when zoomed out, but if it bothers you just click drawing around the hole and drag the anchor/handles to fill it up. Once you are happy with the result, select File → Scripts → AI2ASS to create the ASS drawings.
 AI2ASS
On the window, click on Export and wait till it is finished. Now you can copy the result into your subtitle script and you should see the mask.
 Looks pretty, doesn’t it?
If you see banding in the mask, try increasing the colors to max. However, note that this will create more lines in subtitle file.
This will make the grid background transparent.
Note: this is an archived version of a webpage, the full webpage may still be up at the link at the bottom.
We’re in 2016 yet our computers insist on shipping with atrocious default video decoding settings. The first cardinal sin, which is immediately noticeable, is having a 16-235 range instead of 0-255. Blacks become grey, and pure white is slightly dim.
…
BT.601 is a standard from 1982 which, among other things, defines how RGB color primaries get turned into the YCbCr channels used by modern codecs. BT.709 is a standard from 1990 which does the same thing, but the transfer coefficients are slightly different. And unlike its older counterpart, it was not thought of with standard definition in mind, but HD television.
Here’s the problem: a lot of consumer-grade software is either not aware of the difference between the two, or encodes and/or decodes with the wrong one. There are also assumptions being made; video tends to be decoded as 709 if it’s above 720 pixels in height, and 601 if below, regardless of the coefficients it was actually originally encoded with.
…
Anyway, generally speaking:
- Red too orange, green too dark? 601 is being decoded as 709.
- Red too dark, green too yellowish? 709 is being decoded as 601.
What can you do about this?
Figure a way for your video pipeline to properly handle both.
Adobe Media Encoder may not be as bitrate-efficient as your run-of-the-mill x264+GUI combo, but it does all the right things and writes all the right metadata to make a fully compliant file. And I would argue in this day and age, when you’re encoding to send a file to YouTube, it doesn’t really matter if you’re picking a less bitrate-efficient encoder because if you care about quality to begin with, you’ll be sending a file as high bitrate as possible (probably reaching above 0.4 bits per pixel).
In fact, I just double-checked as I was writing this post: Adobe Media Encoder is the only software I know of which actually encodes video with its proper YCbCR transfer coefficients.
…
Lebled, M. (2016, August 02). BT.601 vs BT.709. Retrieved from http://blog.maxofs2d.net/post/148346073513/bt601-vs-bt709
Impressum
Roland Netzsch
Feichtetstraße 27
82343 Pöcking
Contact Information
Telephone: +49 8157 5971694
E-Mail: [email protected]
Internet address: https://guide.encode.moe/
Disclaimer
Accountability for content
The contents of our pages have been created with the utmost care. However, we cannot guarantee the contents’ accuracy, completeness or topicality. According to statutory provisions, we are furthermore responsible for our own content on these web pages. In this matter, please note that we are not obliged to monitor the transmitted or saved information of third parties, or investigate circumstances pointing to illegal activity. Our obligations to remove or block the use of information under generally applicable laws remain unaffected by this as per §§ 8 to 10 of the Telemedia Act (TMG).
Accountability for links
Responsibility for the content of external links (to web pages of third parties) lies solely with the operators of the linked pages. No violations were evident to us at the time of linking. Should any legal infringement become known to us, we will remove the respective link immediately.
Copyright
Our web pages and their contents are subject to German copyright law. Unless expressly permitted by law, every form of utilizing, reproducing or processing works subject to copyright protection on our web pages requires the prior consent of the respective owner of the rights. The materials from these pages are copyrighted and any unauthorized use may violate copyright laws.
Source: Englisch-Übersetzungsdienst translate-24h (modified)
Privacy Policy
-
This page does not store any of your data by itself.
-
We are using the services of CloudFlare.
This service uses cookies to authenticate you so you won’t be shown captchas on your visit. We are using extensions provided by CloudFlare that detects your browser version and injects additional content if you are using an outdated browser.
-
This project is hosted on GitHub.
GitHub may store information about your visit in the form of log files. Read the privacy policy of GitHub for further information.